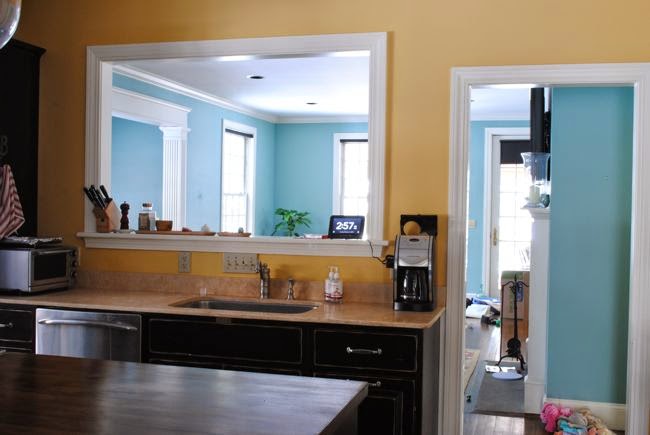
I’m so completely thrilled with the way the kitchen renovation is coming together, it’s hard for me to pick a favorite part…but if I had to pick, it would be a toss up between the new countertops and the transom windows.
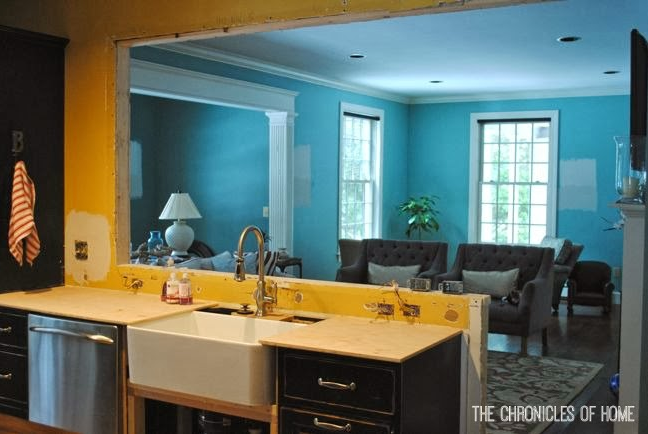
The big part of the kitchen project we hired out was the opening up of the wall between the kitchen and family room.
I swear, every pipe and wire in the first floor must have run through this wall, so it was beyond Scott’s or my skill set to reroute everything ourselves. We met a carpenter when we lived in our last house, Chris Skocay, who is just wonderful, so we were very happy to have him run the opening of the wall and then we hired out the plumbing and electrical work separately.
Once the electrical and plumbing work was done, Chris opened the wall up completely and framed out the opening with wood boards.
I’ve been so excited to tell you about my source for the transom windows, Transoms Direct. They have so many different style options and all of their transom windows are offered in completely customizable sizes. The quality is fantastic and even Chris, who is a master carpenter, was impressed with them and said he would order them for future projects. I can’t say enough great things about their product – just top-notch.
We ordered a very traditional style transom, and once they arrived Chris got to work installing them.
We had three separate transoms, so Chris installed them one by one, starting with the one along the wall.
Each transom was screwed into the wood piece above to hold it in place, and then secured to the side and top surround pieces with brad nails.


Gorgeous! Looks so light and bright now. x
Thanks, D! I’m so happy with how the look is coming together :)
Looks great – very clean and fresh looking – love the counter top!
Thank you! That’s my favorite part – how bright and clean it looks…even when it’s not :)
And just like that Im completely in love. I cant even stand it. It looks amazing Jen. I will definitely be using your source for the transoms. The detail is just fabulous. You must be so proud and incredibly happy:)
I do just utterly love them. When the time comes comes for you, let me know – I’ll pass along my contact!
i can’t believe how far you have come already! it’s soooooooo pretty!
Ha – thank you :) Feels like soooooo much left still!
Jen it looks awesome! I can’t wait to see it in person!
Thanks, Ally! We need to get a dinner on the books sometime soon – would love to show you the new digs!
This is AMAZING! You two are wonders! What a difference. It looks fantastic as it is…..what color will you be painting the cabinets?
White cabinets! Hoping to get to them May/June. Thanks for the nice comments, Patty!
We are loving our white cabinets. So glad we went with that choice
Patty
Looks beautiful! Such a great idea! I could you starting a real trend with this!
That is very sweet, Genny – thank you! I absolutely love them!
WOW!!!! I cannot believe how beautiful that is!!
Thanks, Gabbi! We love the look so much we’re thinking about adding them across another wide doorway on the other side of the kitchen!
What a difference that makes- kind of hard to believe!
I am hooked on transoms – really want to add some more around the house now!
Loving the changes!!! I’m falling hard for those counters!
Believe me – I am too! Thanks so much :)
It’s amazing how much lighter and brighter it looks! Love the detail of the windows, I would never have thought to add those!
I’ve loved them as a room detail for so long. Now that I have a set I’m totally itching to add more in the house!
What a transomation!! (I promise I won’t say that ever again.) I suddenly need these somewhere in our house. They look AHMAZING.
Such a witty gal :) I want to add them everywhere too. If it didn’t require ripping out trim, I probably actually would be slapping them up everywhere!
Question – how high are your ceilings? I have a similar layout and I’d love to do transom windows, but I’m worried my ceilings are too low…
Our ceilings are 9′. The transoms probably begin about a foot down, though, because we needed space above for pipes and wires. If you didn’t need that, you could put them right up against the ceiling!
How beautiful! We have a similar layout in our home, and I’ve always toyed with the idea of removing the current arch and adding coffered ceilings, but this is amazing, and such a great idea. I’ve been in love with transom windows for so long, and never thought I’d be able to have them in my home. Thanks for the inspiration! Enjoy that beautiful house you have!
Ah – I LOVE coffered ceilings too! I’ve been toying with the idea of adding them to our living room eventually. But, yes, those transoms had me at hello. We might add another row of them in the back of our kitchen :)
Great outcome. The lights look like a custom height (which you can get via your supplier TransomDirect for slightly more $, as you say). I’m going to be doing similar proportions atop a bathroom wall. How tall are those transoms overall or the lights themselves?
Each little transom window is 4.5″ x 10.25″ Good luck with your project, I bet they will look great in a bathroom!