The Chronicles of Home

  • Home
  • Shop
  • About
  • The Projects
    • Decorating
    • Home Improvement
    • Furniture Plans
    • Organizing
  • The Recipes
    • Breakfast
    • Appetizers and Drinks
    • Sides and Salads
    • Main Course
    • Desserts
  • The House
  • Contact
  • Disclosure & Privacy Policy


DIY Lacquered Grasscloth Coffee Table

by Jennifer

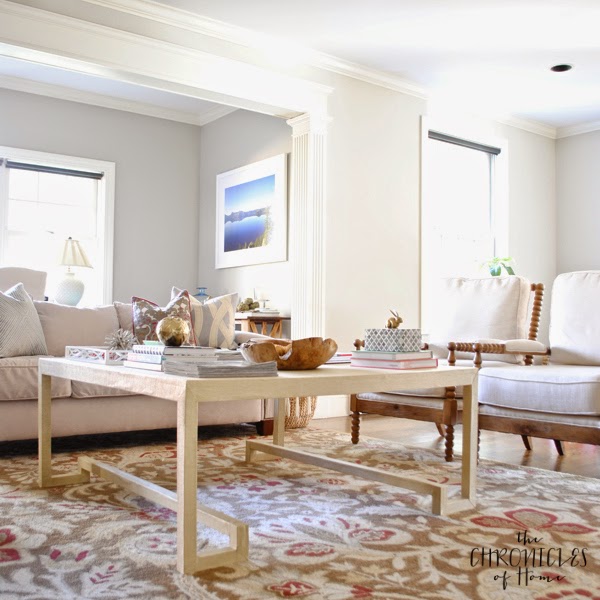
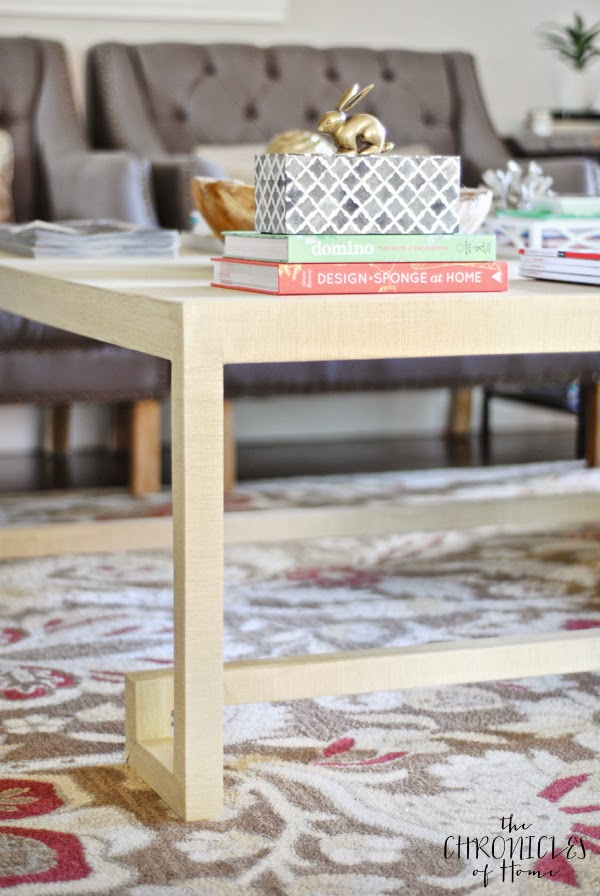
I have been so excited to share the tutorial for my new lacquered grasscloth coffee table with you all, and today is the day!

I’ve been seeing coffee tables with lacquered woven coverings a few different places lately, like Bungalow 5 and Serena & Lily.  They carry a pretty hefty price tag, though, and I could not get the idea of making one myself out of my head.

I know this is very shocking.  When you have recovered we’ll continue. ;)

It pretty much combines my two biggest DIY loves – building and upholstering, even though the upholstering in this case is done with paper.

You got your first peek of the new table last week when my Home Depot Holiday Style Challenge went live.

How to make a DIY lacquered grasscloth coffee table (by The Chronicles of Home)

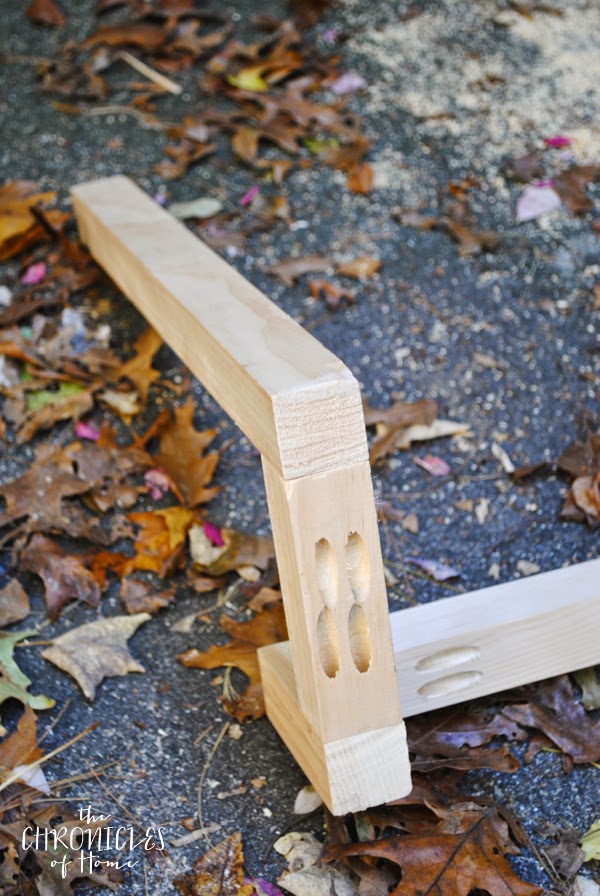
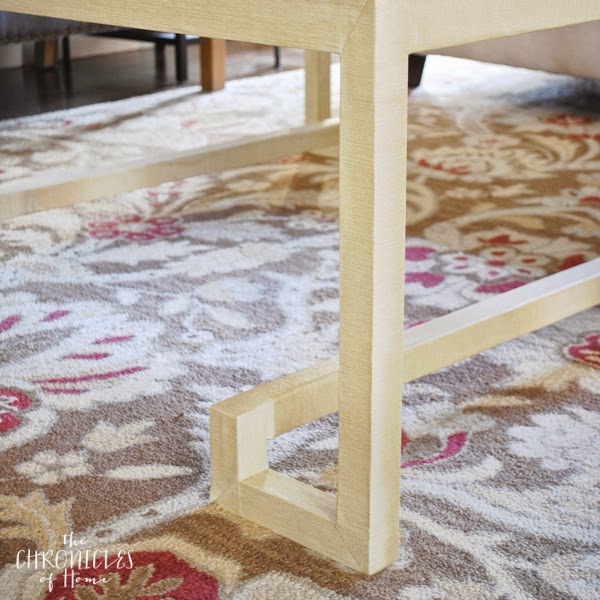
I took design inspiration for the legs from this Worlds Away coffee table, as well as pieces a couple of my blog friends have made recently – nesting marble coffee tables by Sarah Dorsey and an emerald green bar cabinet by Kristin Cadwallader.

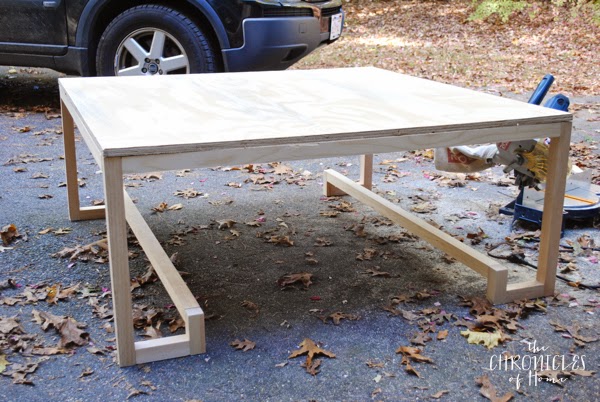
The building of the table was really pretty simple.  I was even a little surprised how quickly I had it ready to be covered!

To build the table I purchased:

  • Three 8′ 2×2 pine boards
  • Two 8′ 1×2 pine boards
  • One sheet of 3/4″ plywood cut to 48″ square (I had this done for me at Home Depot)
I used a Kreg jig and pocket hole screws to assemble everything.
The cuts are all really simple too, though you will want them to be as precise as possible to make sure the table is level and sturdy.  I made the following cuts with a miter saw, though they’re all straight cuts with no angles.
1x2s
4 pieces @ 45″ each
2x2s
2 pieces at 45″ each
4 pieces at 4″ each
4 pieces at 5″ each
4 pieces at 19 1/2″ each
For the assembly, I drilled pocket holes using a Kreg jig, keeping the pocket holes on what would be the underside of the table, then attached the pieces with pocket hole screws, as shown below.
DIY-2Blacquered-2Bgrasscloth-2Bcoffee-2Btable02
DIY-2Blacquered-2Bgrasscloth-2Bcoffee-2Btable01
Once the two legs sections were completed, I attached the 1x2s using the same method.
DIY-2Blacquered-2Bgrasscloth-2Bcoffee-2Btable03
I flipped the frame upside down to attach the plywood top using pocket holes and screws, then turned it right side up again and used an electric pad sander to sand the heck out of it.  Remember that this is going to be covered in paper and bumps and lumps will show through, so you want it as smooth as possible.  Everywhere.
DIY-2Blacquered-2Bgrasscloth-2Bcoffee-2Btable04
Okay, easy part is over :)
Not to say the upholstering with paper is hard necessarily, but it takes some finesse and time and is a pretty precise job.  Tools and supplies I used for this part were grasscloth wallpaper, wallpaper paste (use heavy duty – it’s MUCH stickier and easier to work with), a foam paintbrush, a plastic wallpaper smoothing tool, wet and dry paper towels for wiping excess wallpaper paste, clamps (for any stubborn bits that don’t want to stick right away), sharp scissors, a staple gun, and liquid lacquer (not spray lacquer).
I covered the parts of the table in the following order.
DIY-2Blacquered-2Bgrasscloth-2Bcoffee-2Btable04T
I took pictures of the shapes I wound up using to cover each section but do not try to eyeball these or cut them freehand.  For each piece, I folded and creased around the part to be covered and marked where my cuts and folds would go.  Then I took it off the table and carefully made all my folds and cuts before actually attaching the grasscloth.  Your goal is to make the grasscloth fit the table as smoothly and snugly as possible with sharp, neat corners.
The first section of the table was covered in a piece that looked like this:
DIY-2Blacquered-2Bgrasscloth-2Bcoffee-2Btable05

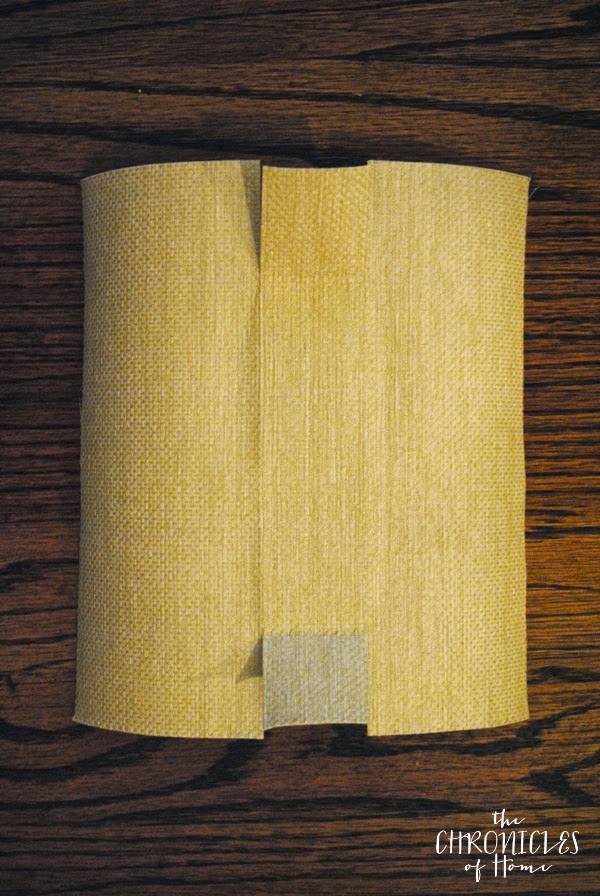
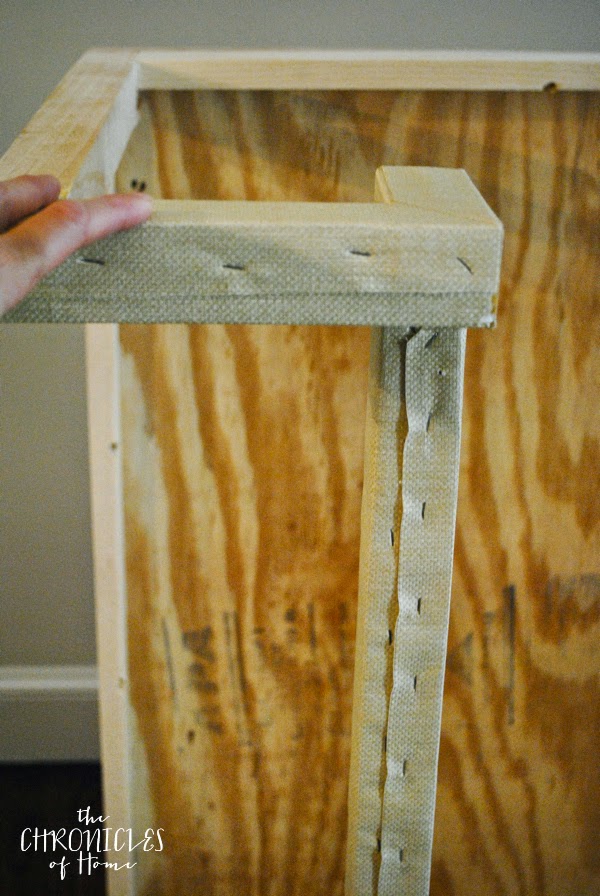
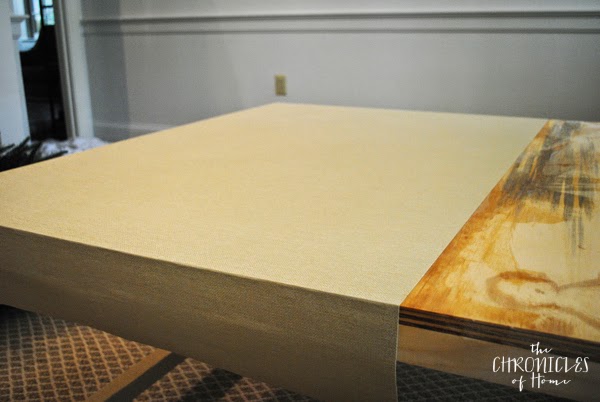
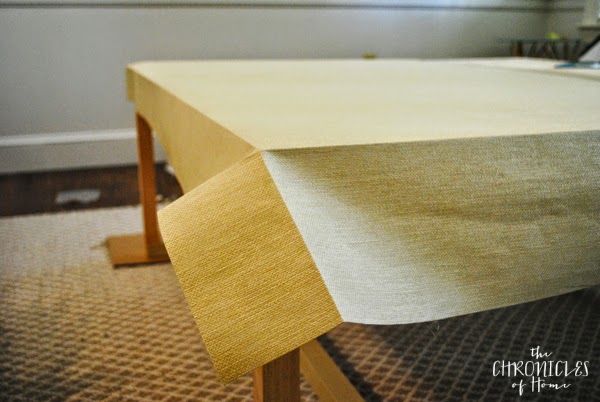
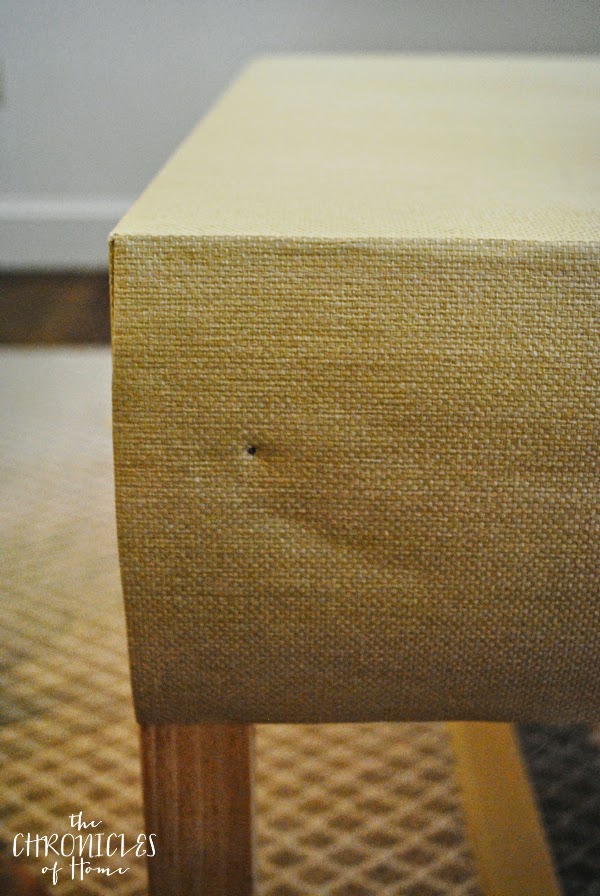
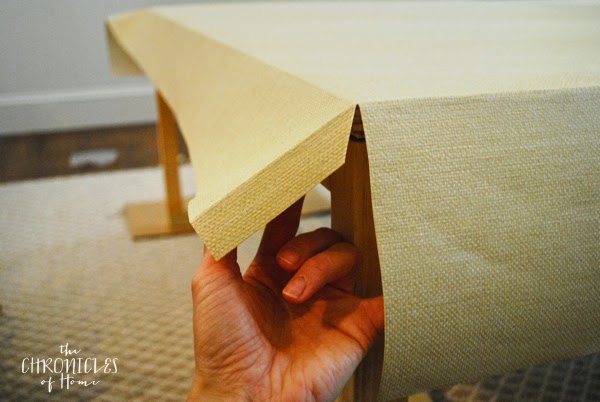
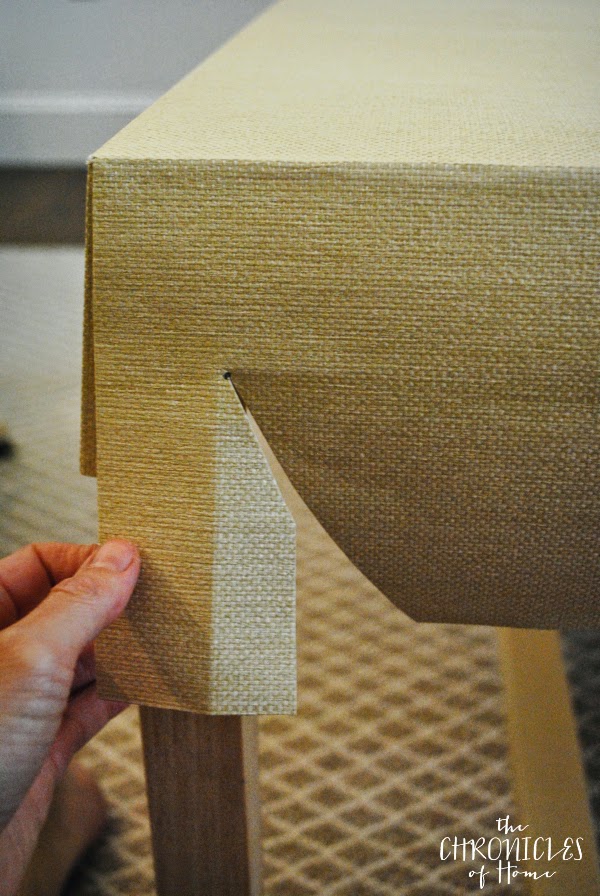
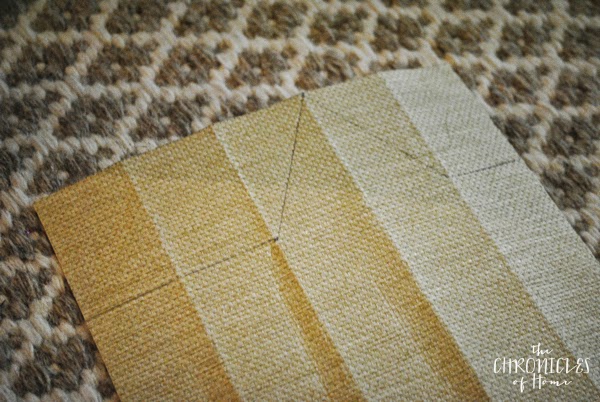
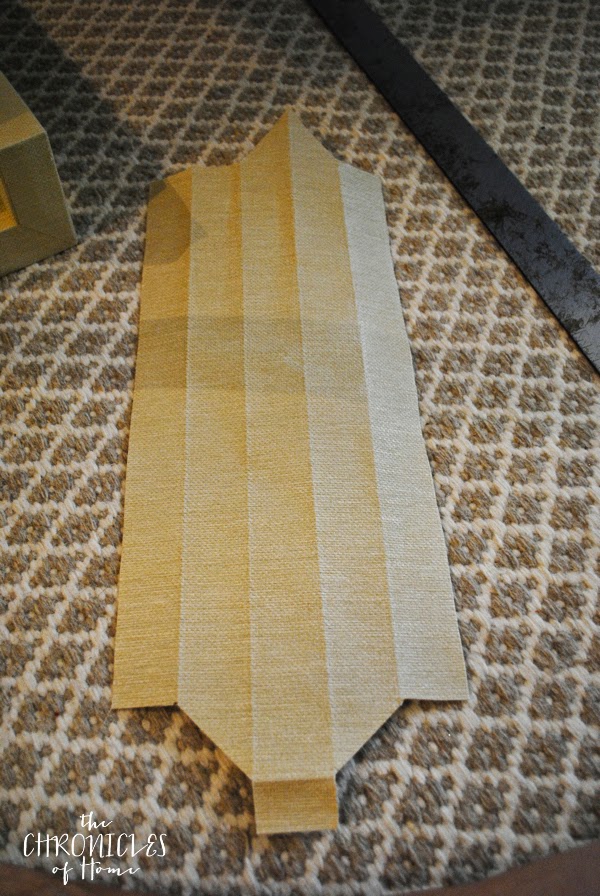
To apply, I used the foam brush to spread wallpaper paste over the section to be covered, then pressed the grasscloth into place and smoothed with the plastic smoothing tool.  I added staples to the undersides of any hidden sections as well.  I used this same process for each section.

DIY-2Blacquered-2Bgrasscloth-2Bcoffee-2Btable06
Once those pieces were attached on all four legs, I moved on to the next section (refer to numbered photo above) and cut and attached the pieces for those.
DIY-2Blacquered-2Bgrasscloth-2Bcoffee-2Btable07
DIY-2Blacquered-2Bgrasscloth-2Bcoffee-2Btable08
Moving on to the top, I started by laying my paper over the surface.  Since my table was so wide, I had to use two side-by-side pieces to cover all the surface area.  I really love the way the Serena & Lily coffee table has four interlocking triangles on top but I hadn’t thought to do it this way.  If you’re careful lining up your seam, however, it’s practically invisible.
DIY-2Blacquered-2Bgrasscloth-2Bcoffee-2Btable14
Once I had the placement of the grasscloth, I started making cuts.
DIY-2Blacquered-2Bgrasscloth-2Bcoffee-2Btable09

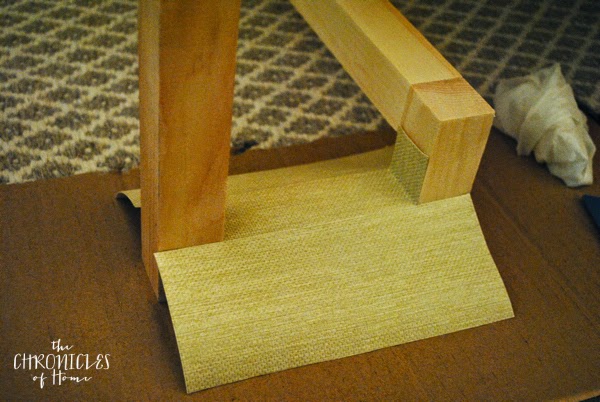
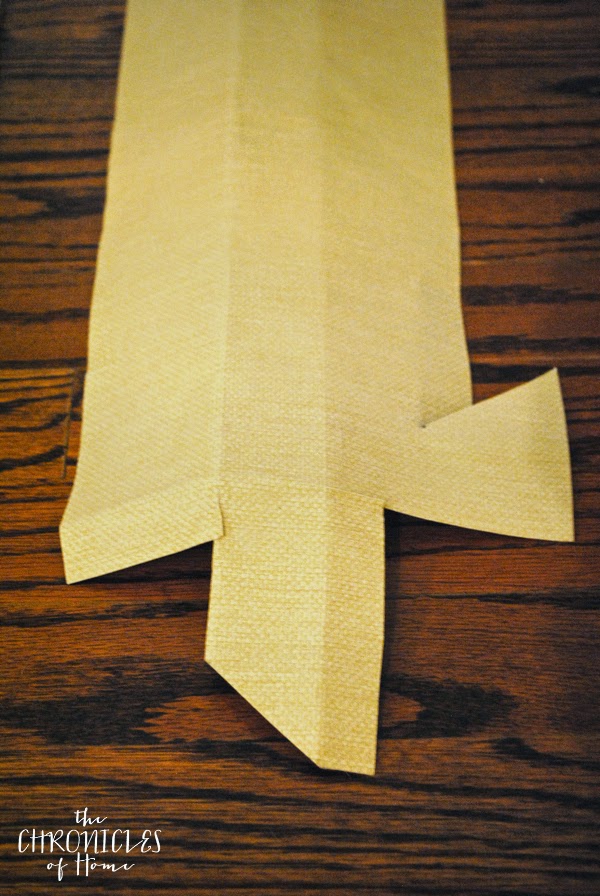
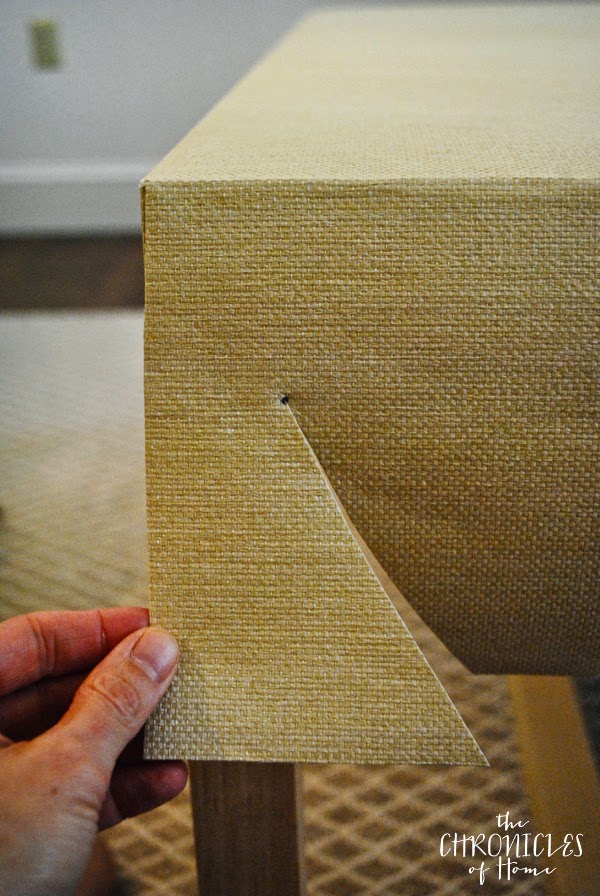
I used a pencil point to poke a hole where the corner under the paper joined together.

DIY-2Blacquered-2Bgrasscloth-2Bcoffee-2Btable11
DIY-2Blacquered-2Bgrasscloth-2Bcoffee-2Btable12
DIY-2Blacquered-2Bgrasscloth-2Bcoffee-2Btable10
DIY-2Blacquered-2Bgrasscloth-2Bcoffee-2Btable13
Once the first top piece was attached, I repeated with the rest of the top, then moved onto the last part of the legs.
DIY-2Blacquered-2Bgrasscloth-2Bcoffee-2Btable15
DIY-2Blacquered-2Bgrasscloth-2Bcoffee-2Btable16
I let the table dry overnight then coated the entire thing in lacquer.  I’m actually thinking of adding another coat or two, even though I applied it pretty thickly the first time.  I don’t want to have a heart attack every time someone sets a drink down on the table.
And even though I first showed you the table in my living room with the Style Challenge decorations, I always intended for it to end up in our family room.
DIY-2Blacquered-2Bgrasscloth-2Bcoffee-2Btable17
I really, really love the results, especially the sharp curves of the legs.
DIY-2Blacquered-2Bgrasscloth-2Bcoffee-2Btable18
You can see here how well the large square table fills the space between the sofa and four chairs.
DIY-2Blacquered-2Bgrasscloth-2Bcoffee-2Btable19
No matter how hard I tried to pull the chairs close to the old rectangular coffee table to create a cozy seating area, they always managed to slide their way back against the wall (the gray chairs on the left).  You know what they say – if you can’t beat ’em…build a new coffee table.  Right?  Isn’t that how the saying goes?
The grasscloth adds just the perfect amount of subtle texture.
DIY-2Blacquered-2Bgrasscloth-2Bcoffee-2Btable20
And I loooooooove how the open style has completely opened the feel of the room.  Nothing is blocked by the coffee table now.
DIY-2Blacquered-2Bgrasscloth-2Bcoffee-2Btable21
It’s substantial but airy, modern yet classic, interesting yet subtle.  A total study in contrasts and I absolutely adore everything about it.  I also have a totally unique piece, which I love, and I saved myself thousands over the cost of any of the ready-made lacquered woven tables out there.  A total win in all aspects!
How to make a DIY lacquered grasscloth coffee table (by The Chronicles of Home)
* * * * * * *


http://cialisnextdaydeliveryusa.com
http://rxbuywithoutprescriptiononline.net/zoloft.html
http://noprescriptionrxbuyonline.com/nolvadex.html

Filed Under: Decorating, Furniture Plans

« Free 9×12 Framing Winner!
F4 »


Comments

  1. Julia @cuckoo4design says

    at

    Speechless, it’s just so so so good!

    • Jennifer@TheChroniclesofHome says

      at

      Haha – thank you! Speechless?! That’s definitely something ;)

  2. Ashley Mayes says

    at

    Love how this turned out! Just beautiful!

    • Jennifer@TheChroniclesofHome says

      at

      Thanks, Ashley! I really, really love it too. It’s just how I hoped it would turn out, which is always a good feeling :)

  3. Cassie Bustamante says

    at

    OHMYWOW. so let’s start a commune of creatives and then we can all trade services, ok?

    • Jennifer@TheChroniclesofHome says

      at

      That would be AMAZING. Can you even imagine?!

      • Cassie Bustamante says

        at

        i think the tribe is a good place to start.

        Subject: Re: New comment posted on The Chronicles of Home: DIY Lacquered Grasscloth Coffee Table

  4. astrollthrulife says

    at

    This is just gorgeous and such a fabulous tutorial too.

    • Jennifer@TheChroniclesofHome says

      at

      Thank you, Marty! I am truly thrilled at how it came out. My girls love to lie under it too and treat it like a little fort :)

  5. katiesperk says

    at

    This turned out so well! I love the shape. I am grassclothing my dining room!!

    • Jennifer@TheChroniclesofHome says

      at

      Funny – I just finished grassclothing my dining room! I’m hooked on the texture, just love it.

  6. Pam @ Simple Details says

    at

    Holy moly, this is SO impressive, Jen! I love how your beautiful room is coming together, it’s the perfect piece!

    • Jennifer@TheChroniclesofHome says

      at

      Thank you, Pam! It’s definitely one little step at a time over here but I really love how it’s all coming together too, and maybe especially the new coffee table. And the spool chairs :)

  7. Kristin Strickler Cadwallader says

    at

    Wow! Amazing! Your furniture building skills are on the next level :)

    • Jennifer@TheChroniclesofHome says

      at

      Says the lady who built that bar cabinet :) Thanks, sweets!

  8. sarah m dorsey says

    at

    Wow!! Super impressive (the base is so complicated for upholstering!!) amazing job :) Thanks for the link too!! I’d love to give this a try sometime (maybe that’s what I’ll do with my turquoise grasscloth!)

    • Jennifer@TheChroniclesofHome says

      at

      There you go – perfect idea for extra grasscloth! I saw Serena and Lily makes a side table version too – am rolling that over in my head right now for a project down the road :)

  9. Charlotte Smith says

    at

    I’m went through 3 stages of anxiety and exhaustion just reading this! So beautiful!! You’re a MUCH more patient woman that I… it looks AMAZING.

    • Jennifer@TheChroniclesofHome says

      at

      Hilarious :) It did test my patience a little, but honestly was better than I expected. It was like a giant puzzle, and I kind of like figuring out things like that.

  10. Gwen, The Makerista says

    at

    This is sooo incredible! Pinning away!

    • Jennifer@TheChroniclesofHome says

      at

      Thanks, Gwen, so nice!

  11. freckleschick4 says

    at

    Utterly amazing!!!! I’m now wishing I live in the Boston area so I could score a custom piece by you.
    xo

    • Jennifer@TheChroniclesofHome says

      at

      Seriously WHY DO YOU NOT LIVE HERE?!

  12. Amber @ Wills Casa says

    at

    You did an incredible job!! I love the texture of the coffee. It’s a genius idea!

    • Jennifer@TheChroniclesofHome says

      at

      Thanks, girl! It’s one of favorite design build pieces to date. Maybe my top favorite even.

  13. Katja | Shift Ctrl ART says

    at

    That is such a chic and stylish table. I love the grass cloth texture you added. I am so impressed with how good it looks. Love the scale of it!! Awesome DIY!!

    • Jennifer@TheChroniclesofHome says

      at

      Thanks, Katja! I really love how it came out. In typical fashion, I now want grasscloth everything…

  14. Danielle Driscoll says

    at

    I LOVE how this came out. Gorgeous, Jen. x

    • Jennifer@TheChroniclesofHome says

      at

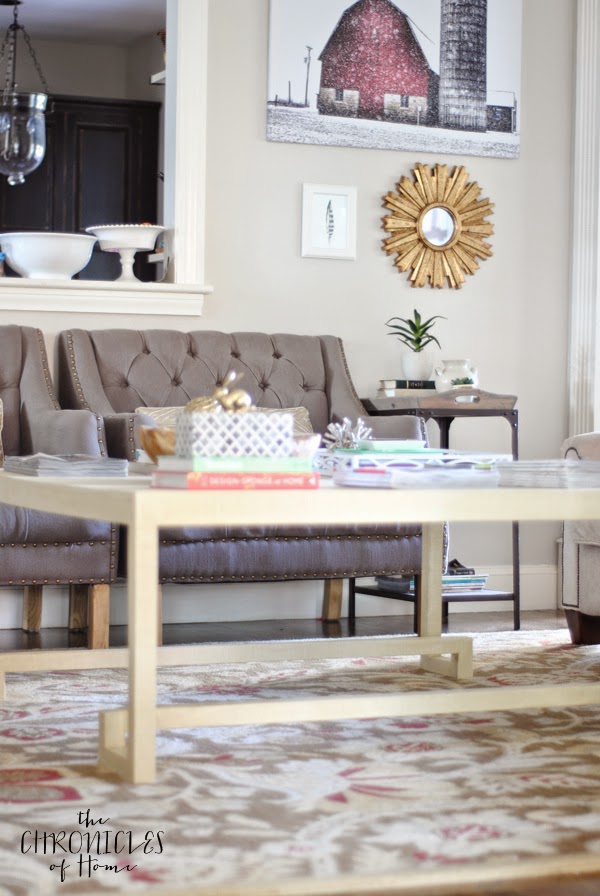
      Thanks so much, Danielle! I love it too :) It fits the family room SO much better than what was here before, it’s really changed the look of the whole room.

  15. Caitlin @ Desert Domicile says

    at

    Your coffee table is so gorgeous Jen! I have to ask: where’d you get your chairs (both sets)? I’m looking for some new ones but can’t find any like yours and I love them!

    • Jennifer@TheChroniclesofHome says

      at

      Thanks, Caitlin! I bought the gray chairs from Joss and Main about a year ago, but I’ve seen them pop again there since. The maker was Lowrey and Lane and the chair was called the Charlotte Armchair. The spool chairs were a Home Goods find about a month ago. I’ve loved that style for ages. Z Gallerie and Land of Nod make spool chairs too, less expensive than most you’ll find but Home Goods was definitely the cheapest. I know some other people saw them at their local stores so it would be worth checking out!

  16. Carmel Phillips says

    at

    This is amazing! I LOVE it!

    • Jennifer@TheChroniclesofHome says

      at

      Thank you, Carmel :) I REALLY love it too. Maybe too much. I was drinking red wine the other night and was about to put my glass down and had this “Uhhhhhhhhhhhhhhhhhh maybe I shouldn’t do that” moment!

  17. Gretchen@BoxyColonial says

    at

    Whoa! That’s some seriously impressive work there! I was following along, thinking, “yeah, I think we could do that” until you got to the grasscloth part….I think mine would look very much like a kindergartener’s table if I tried that ;). I love it!

    • Jennifer@TheChroniclesofHome says

      at

      Well it was a little tedious, but I actually kind of enjoyed the puzzle of it all. I have an odd side to my personality that is very drawn to precise work :) Thanks, Gretchen!

  18. Sarah says

    at

    SO gorgeous Jen!

    • Jennifer@TheChroniclesofHome says

      at

      Thanks, Sarah!

  19. Jill says

    at

    I love it all! and I love that rug too- can you tell me where you got it?

    • Jennifer@TheChroniclesofHome says

      at

      The rug was from Pottery Barn year ago – they don’t carry it anymore :(

  20. Ashley@AttemptsAtDomestication says

    at

    That coffee table is gorgeous! You did a fantastic job! And that is such a creative idea.

    • Jennifer@TheChroniclesofHome says

      at

      Thanks so much, Ashley!

  21. Shavonda@SGStyle says

    at

    Seriously! You and Sarah make me want to hide in a corner and never come out again! this is so good my friend. Its so gorgeous. Love the grasscloth and have I mentioned how much I loooove those spindle chairs. Im on the hunt for a black one like nobodys business. Thanks for sharing sweets.

    • Jennifer@TheChroniclesofHome says

      at

      You are so funny :) Don’t you dare go hide in a corner. As if!

  22. Brynne Delerson says

    at

    This is such an amazing and impressive DIY! I’m floored! Way to go girl!!!

    • Jennifer@TheChroniclesofHome says

      at

      Thanks so much, Brynne. Such a nice comment. At the risk of sounding conceited, I do LOVE how it came out :)

  23. natalie says

    at

    This is amazing and I would like to try it myself! Would you share the brand name of the lacquer? I know you said liquid not spray, but I just want to make sure I do this right!

Trackbacks

  1. Top 5 of 2014 says:
    at

    […] thought maybe my favorite furniture build of 2014 would make the list, this DIY lacquered grasscloth coffee table I love more and more every day it lives with […]

  2. DIY Beaded Pendant Light says:
    at

    […] light was one of the DIY projects I did for the Home Depot Holiday Style Challenge (the DIY lacquered grasscloth coffee table was the other one).  Once I recovered from the Great Garage Door Crash of ’14 I […]

  3. Christmas Home Tour 2014 says:
    at

    […] I was determined not to micromanage them as they went about their merry work.  (tutorial for the DIY lacquered grasscloth coffee table can be found […]


Meet Jen

I'm a design and DIY lover, decorator, modern home-maker, foodie, fashion enthusiast, and jill-of-all-trades when it comes to home improvement. I'm slowly but surely adding classic-contemporary style to my early 90's colonial home one inch at a time and I'm taking you along for the ride.

It's often messy - there are usually project remnants and toys strewn about - but the making of a home isn't always tidy work and I love showing you how you can make and style and organize your way to a home and a life you love!

Search the Chronicles of Home


AS SEEN IN


Copyright © 2023 · The Chronicles of Home · Privacy Policy

Copyright © 2023 · Foodie Pro Theme on Genesis Framework · WordPress · Log in