The Chronicles of Home

  • Home
  • Shop
  • About
  • The Projects
    • Decorating
    • Home Improvement
    • Furniture Plans
    • Organizing
  • The Recipes
    • Breakfast
    • Appetizers and Drinks
    • Sides and Salads
    • Main Course
    • Desserts
  • The House
  • Contact
  • Disclosure & Privacy Policy


DIY 3D Christmas Star Wreath – Holiday Thrift Store Challenge

by Jennifer

Hi there!

The ever lovely Alice of Thoughts from Alice had this great idea – round up a group of bloggers who would all go to a thrift store, buy something for under $25, and transform it into a Christmas decoration.  The point of which is to show that lovely Christmas decor doesn’t have to cost a small fortune.

I loved both the sentiment behind the idea and the challenge of making something pretty and Christmasy out of found items.

But……..well, I kind of cheated.

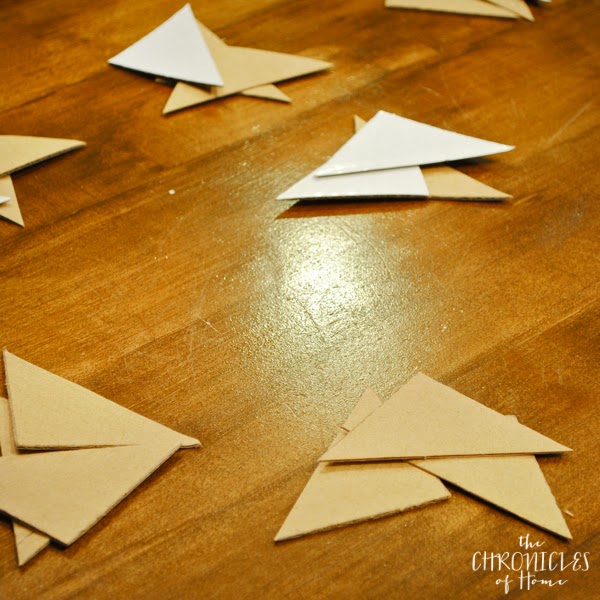
I kept meaning to stop by a thrift store and all of a sudden it was Tuesday, I had two days left, and knew I needed to pull something together.  So I started thinking about the idea behind the challenge, the pretty decorations for less than a pretty penny.  I was breaking down some cardboard boxes to put in the recycling bin and stopped with a piece in my hand as the idea to make a 3D Christmas star slowly came together in my head.

And it all kind of fell together from there.  This project is definitely a work in progress – I’ll tell you about a few little issues I had and what I would do differently next time.  I’m already thinking about taking this idea one or two steps further!

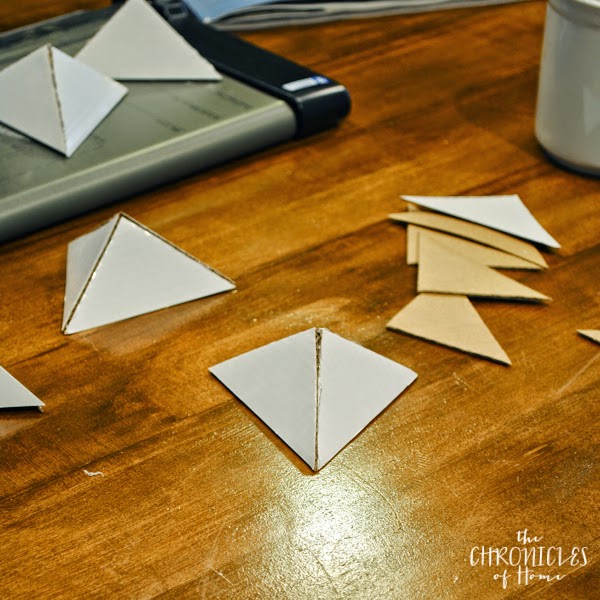
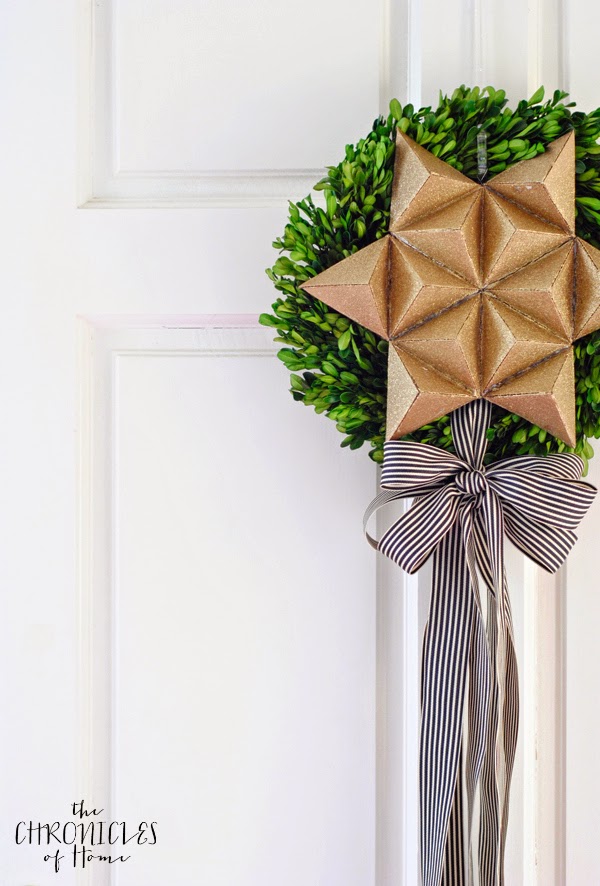
To make the star, I used a paper cutter to cut nine 3.5″ square pieces of cardboard.  I drew a straight line from corner to corner and then used sharp scissors to cut each square into four equal triangles.

DIY-2B3D-2BChristmas-2BStar-2BWreath2

I separated the triangles into piles of three and used hot glue to attach each group of three into a pyramid.

DIY-2B3D-2BChristmas-2BStar-2BWreath3

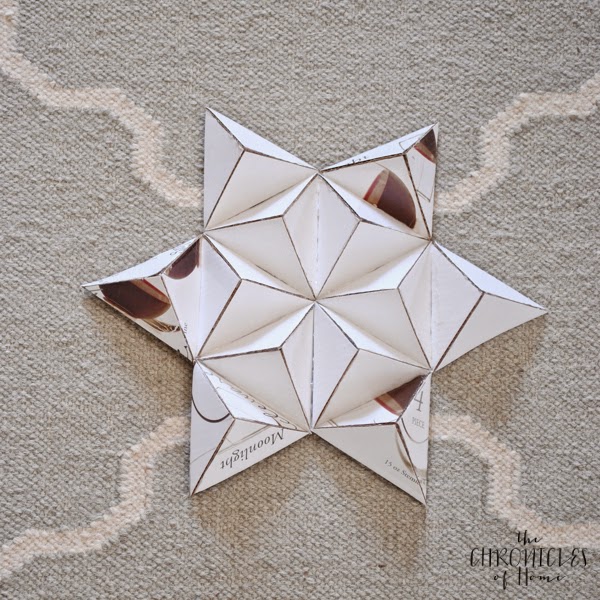
Then I hot glued the pyramids together in the shape of a star.

DIY-2B3D-2BChristmas-2BStar-2BWreath4

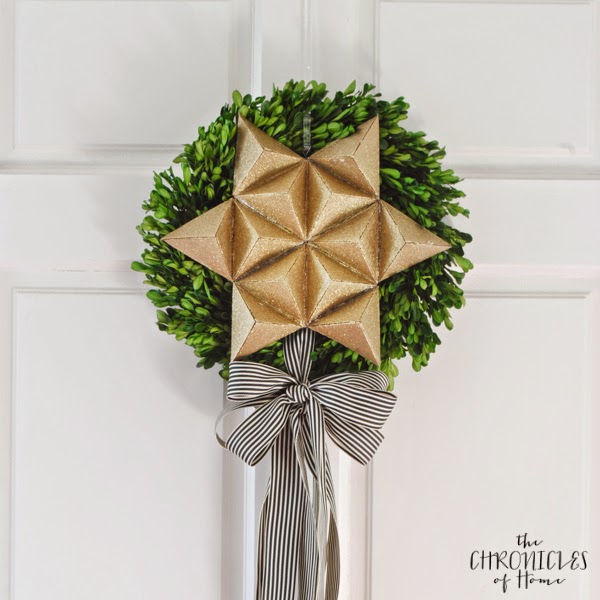
After the glue had fully dried I spray painted the star first with gold spray paint and then with gold glitter spray paint.

Now here’s what I would do differently next time.

  • Use something a bit more uniform than corrugated cardboard – either a solid cardboard or even mat board.
  • I’d spray paint the pyramids before assembling them into a star – the star was really sturdy but the wetness or chemicals in the spray paint must have softened the glue and when I picked it up after the paint had dried, a bunch of pyramids fell off.
  • I might try a different glue that would allow me to easily wipe away excess.
Even so, I’m really happy with how this came together for an off the cuff project, and it essentially cost me $0.  I used cardboard from the recycling bin and all other supplies I had on hand (granted they cost something whenever I bought them!).
To really turn the star into a Christmas decoration, I hung it in front of the boxwood wreath that’s always on the inside of my front door and looped some black and white striped ribbon I had around the bottom of the wreath.
DIY-2B3D-2BChristmas-2BStar-2BWreath5
(Details on my entry rug can be found HERE)
I love that it’s simple but also a bit unexpected, and it is glittery and incorporates stripes which are two of my favorite things.
Raindrops on roses and whiskers on kittens,
Glittering star shapes and drapey striped ribbon…
 
That’s how the song goes, right?
DIY-2B3D-2BChristmas-2BStar-2BWreath9
I’m really excited to play with this idea some more and bring a few other 3D stars into my Christmas decor this year.
DIY-2B3D-2BChristmas-2BStar-2BWreath7

On an unrelated note, if you’re new around here, be sure to enter two fantastic giveaways I have going on right now – one for a Hoover Air Cordless Vacuum Cleaner (the new home tool love of my life), and the other for a collection of favorite things chosen by me and nine other bloggers, valued at over $300!

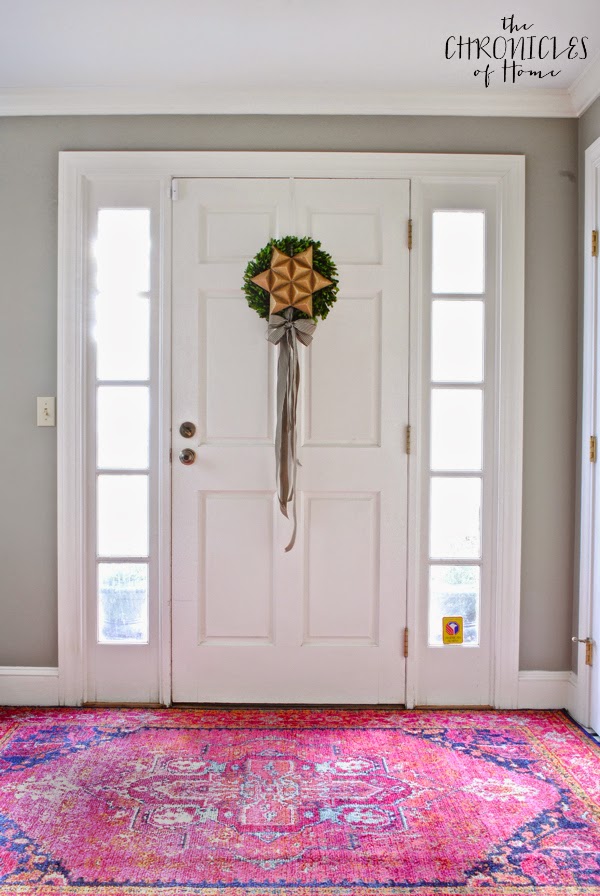
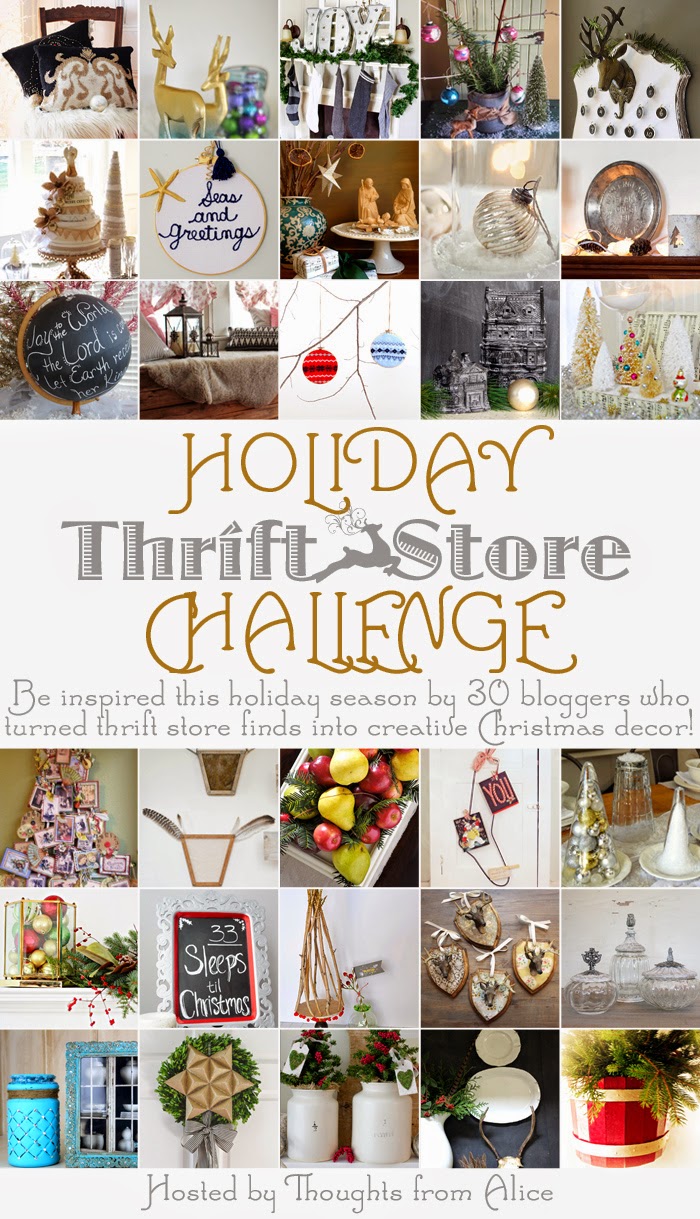
Now, you really must hop around and check out what everyone else did with their actual thrift store finds.  It’s so good, you guys.  So good.

Glam Christmas Throw Pillows by Thoughts from Alice
A Deer Thrift Store Makeover by Ciburbanity
Ugly Ducklings (Thrifted Sweater Stockings) by Maison de Pax
A Deerly Beloved Thrift Store Vignette by Have a Daily Cup of Mrs. Olson
Holiday Thrift Store Challenge: Deer Mount Advent Calendar by Primitive & Proper
{Vintage Cookie Tin} Cake Centerpieces by Little Farmstead
DIY Embroidery Hoop Wall Hanging: Holiday Thrift Store Challenge by Simple Stylings
DIY Christmas Decorations from Thrifted Books by T-Shirt & Jeans
Christmas Cloche by Craftberry Bush
A Vintage Mantel for Winter by Finding Silver Pennies
Holiday Thrift Store Challenge – Christmas Chalkboard Globe by Heart Rocks in My Pocket
Thrifty DIY Part One: Faux Fur Throw Rug by Creating Vintage Charm
DIY Holiday Walling Hanging by House of Hipsters
Holiday Thrift Store Challenge: Modern Christmas Village by Number Fifty-Three
Christmas Decor from Thrifty Find by Town and Country Living
The Trellis Tree by Cozy Little House
Holiday Thrift Store Challenge Blog Hop by Shabby Love
DIY Centerpiece Tray by Cherished Bliss
Holiday Thrift Store Challenge – Vintage Sock Stretcher Stocking by Alex Inspired
A Merry Thriftmas Challenge: Re-purposed Holiday Tablescape by Home Remedies
Light Fixture Update – a Thrift Store Challenge by Nest of Posies
Holiday Thrift Store Challenge: Simple Christmas Decorations by Two Purple Couches
Rustic Christmas Tree by Delineate Your Dwelling
Oh Deer, It’s a Holiday Thrift Shop Challenge by My Sweet Savannah
Simple Elegant Winter Vignette | Holiday Thrift Store Challenge by Cloth and Patina
DIY Shabby Chic Picture Frame365 Days of Crafts
DIY 3D Christmas Star Wreath – Holiday Thrift Store Challenge by The Chronicles of Home
DIY Crocks by So Much Better With Age
Simple Holiday Vignette | A Thrift Store Challenge by Restoration House Interiors
Thrift Store Christmas Decor Challenge by BrocanteuseRose
How-2Bto-2Bmake-2Ba-2B3D-2BChristmas-2BStar
* * * * * * *


http://yourcialisrx.com/cialis_professional.html
http://rxbuywithoutprescriptiononline.com/lipitor.html
http://rxbuywithoutprescriptiononline.com/lexapro.html

Filed Under: Decorating

« Cleaning Up After DIY Projects Just Got a Lot Easier
What I’m Making for Thanksgiving – Classic with a Twist »


Comments

  1. Julia @cuckoo4design says

    at

    So pretty! Love it! And was just wondering if I have the same black and white rug as you. Never noticed before.

    • Jennifer@TheChroniclesofHome says

      at

      I think it is the same, except mine is just a mat by my back door :) I need a simple geo rug for a second seating area in my family room, maybe I will hit you up for your contact :)

  2. Rachel Rardon says

    at

    Super cool. Love it on the wreath with that ribbon! This project has so many possibilities – tree ornaments, tree topper, I think it would be awesome to even have tons of them in different sizes hung on the wall! And please tell me that IS cardboard from boxed wine. :) Tee hee.

    • Jennifer@TheChroniclesofHome says

      at

      You are reading my mind – I’ve been tossing all those ideas around in my head! And do you know how much I want to tell you the cardboard is from boxed wine?! It was from a stemless wine glasses box :) You are quite the eagle eye!

  3. Kristin Strickler Cadwallader says

    at

    Super cute Jen :) xoxo

    • Jennifer@TheChroniclesofHome says

      at

      Thanks, love!

  4. Danielle Driscoll says

    at

    So clever. x

    • Jennifer@TheChroniclesofHome says

      at

      Born of necessity! But thank you :)

  5. Alice Wingerden says

    at

    I cannot even believe that this started as cardboard! I totally love that you “cheated” ;) and made something so amazingly inspiring! Awesome job and thanks for taking the challenge with me!

    • Jennifer@TheChroniclesofHome says

      at

      Haha – well thank you. I was feeling guilty about my cheat but I sort of “thrifted” the cardboard :) And thank YOU for being such an extraordinary organizer!

  6. Brynne Delerson says

    at

    This is so fantastic, Jennifer! And so great that all of us probably have most of the supplies on hand to make one ourselves!

    • Jennifer@TheChroniclesofHome says

      at

      I really can’t wait to play with the idea some more. I have some dense cardboard on hand that I think would be perfect. This isn’t helping my supplies-hoarding tendencies…

  7. Kennesha {Restoration House In says

    at

    Love this Jennifer! Wow! I can’t even begin to imagine what else is stored away in that brain of yours! So creative! Happy Friday, love! xo

    • Jennifer@TheChroniclesofHome says

      at

      You are funny :) You don’t want to know what’s stored in my brain – I imagine it looks something like tie dye.

  8. Cassie Bustamante says

    at

    this is awesome and totally thrifty even if not from a thrift store entirely!

    • Jennifer@TheChroniclesofHome says

      at

      That’s what I was going for – thrifty :)

  9. Kyla @ House Of Hipsters . com says

    at

    This turned out really cute, so how cares if you cheated a bit =) I love that ribbon and I’m so happy you put the link to your rug post! OMG! Show stopped! LOVE IT!

    • Jennifer@TheChroniclesofHome says

      at

      I’ve had the rug almost a year now and still pause and pet it practically every day. Totally my favorite.

  10. Nicki says

    at

    This is so clever Jennifer! I never would have come up with this concept. It is a bit unexpected, and I love the dimension to it. Great job!

    • Jennifer@TheChroniclesofHome says

      at

      Thanks, Nicki. Thank goodness the idea struck me, I was getting a little stressed!

  11. Tammy says

    at

    This is so so clever! Love that it’s a bit of the unexpected and super fun!

    Tammy

    • Jennifer@TheChroniclesofHome says

      at

      Thanks, Tammy!

  12. My Altered State says

    at

    I absolutely LOVE this geometrical stroke of genius! Beautiful.

    • Jennifer@TheChroniclesofHome says

      at

      Genius – nice, I’ll take it! Thanks :)

  13. niki meiners says

    at

    Great construction. I love all the dimension it brings.

    • Jennifer@TheChroniclesofHome says

      at

      Thank you! Me too, I love the dimension of it.

  14. Sarah says

    at

    So pretty! And looks so complex but sounds easy enough to make. I may have to give it a try!

    • Jennifer@TheChroniclesofHome says

      at

      Seriously simple, and not even that tedious like some projects like this can be :)

  15. Jann Olson says

    at

    The star really is elegant and I love the dimension! Very creative! Thanks for the tips.
    hugs,
    Jann

    • Jennifer@TheChroniclesofHome says

      at

      Thanks, Jann!

  16. Summer Hogan says

    at

    I love this start and with the wreath and ribbon it’s the perfect piece!!!

    • Jennifer@TheChroniclesofHome says

      at

      My first little toe into Christmas decorating!

  17. Charlotte Smith says

    at

    Oh right… cardboard box = amazing gold star. What?! I LOVE the idea of making a big ol’ giant one to plunk somewhere… looks like it could be terrific busy work! Better get over to Amazon so I can have some cardboard boxes to work with. The things I do for crafting… ;)

    • Jennifer@TheChroniclesofHome says

      at

      Yes, me too – I definitely have a giant star on the brain!

  18. Amber @ Wills Casa says

    at

    Love it Jennifer!! It looks great, and you can’t beat $0!!

    • Jennifer@TheChroniclesofHome says

      at

      Husband is a big fan of anything around here that cost me $0 too :)

  19. Katrina says

    at

    Very pretty!!!

  20. Emily @ TwoPurpleCouches says

    at

    I would’ve NEVER guessed that this was made from cardboard!!! Incredible!

Trackbacks

  1. DIY Crocks | So Much Better With Age says:
    at

    […] DIY 3D Christmas Star Wreath – Holiday Thrift Store Challenge by The Chronicles of Home […]


Meet Jen

I'm a design and DIY lover, decorator, modern home-maker, foodie, fashion enthusiast, and jill-of-all-trades when it comes to home improvement. I'm slowly but surely adding classic-contemporary style to my early 90's colonial home one inch at a time and I'm taking you along for the ride.

It's often messy - there are usually project remnants and toys strewn about - but the making of a home isn't always tidy work and I love showing you how you can make and style and organize your way to a home and a life you love!

Search the Chronicles of Home


AS SEEN IN


Copyright © 2023 · The Chronicles of Home · Privacy Policy

Copyright © 2023 · Foodie Pro Theme on Genesis Framework · WordPress · Log in