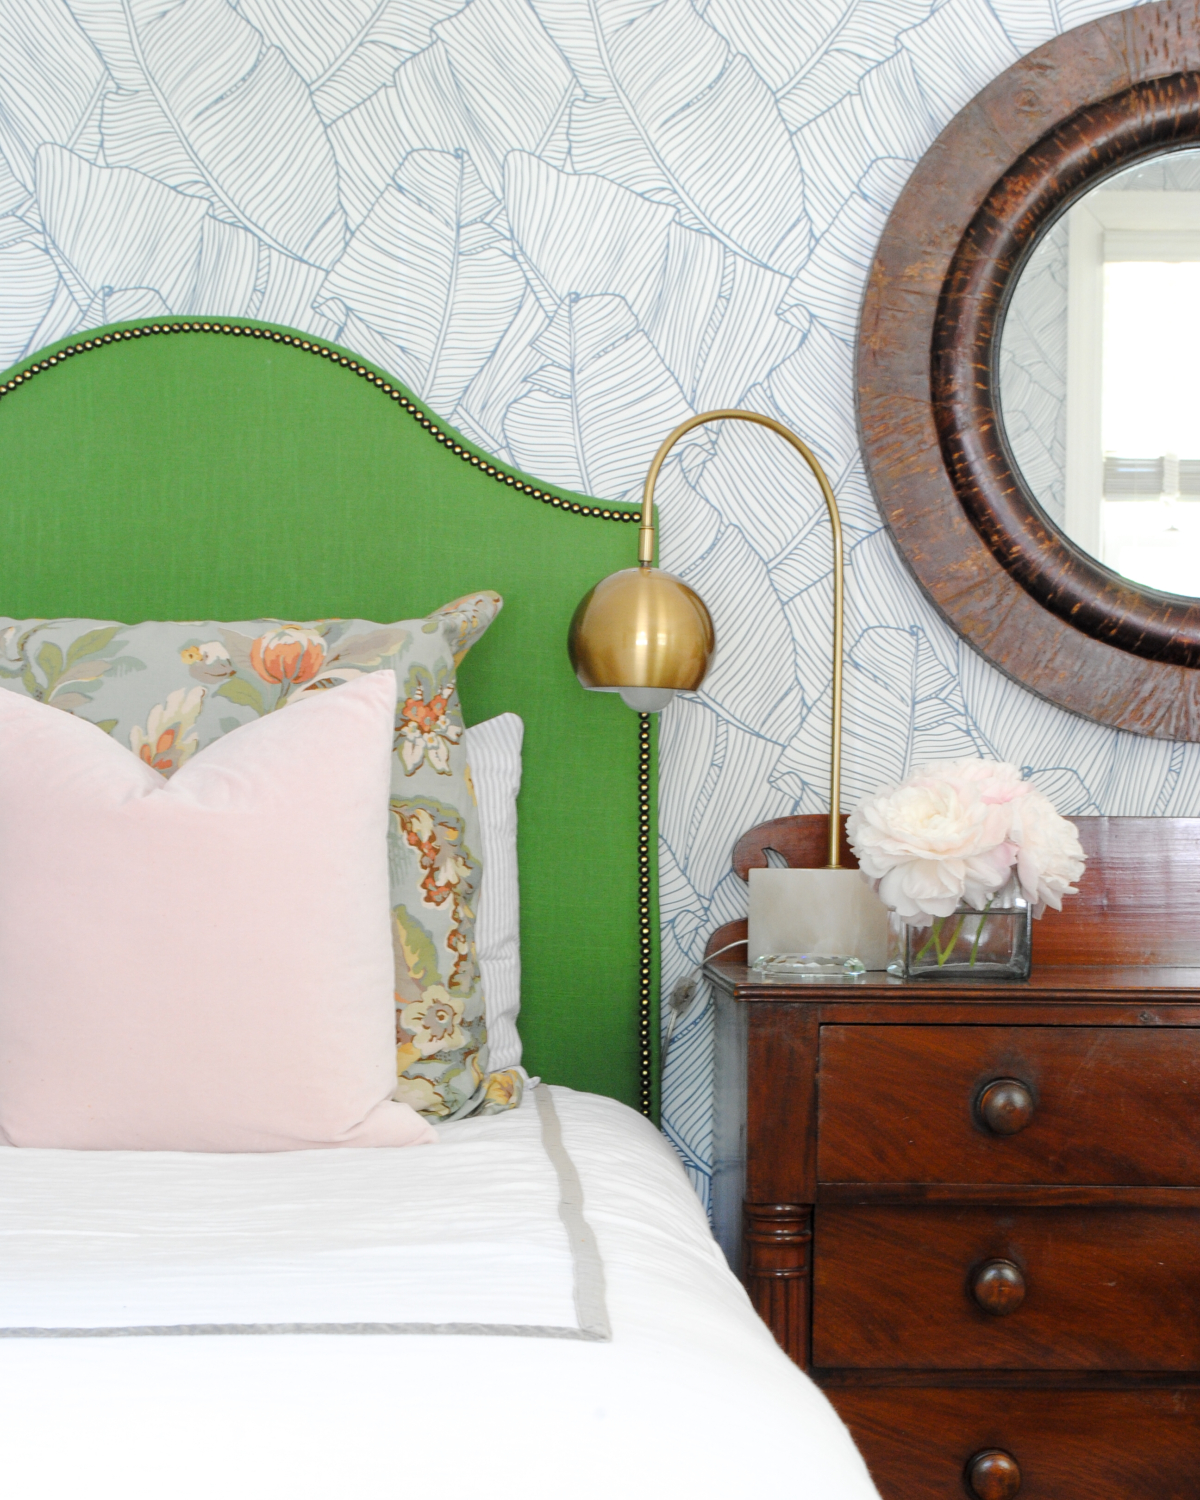
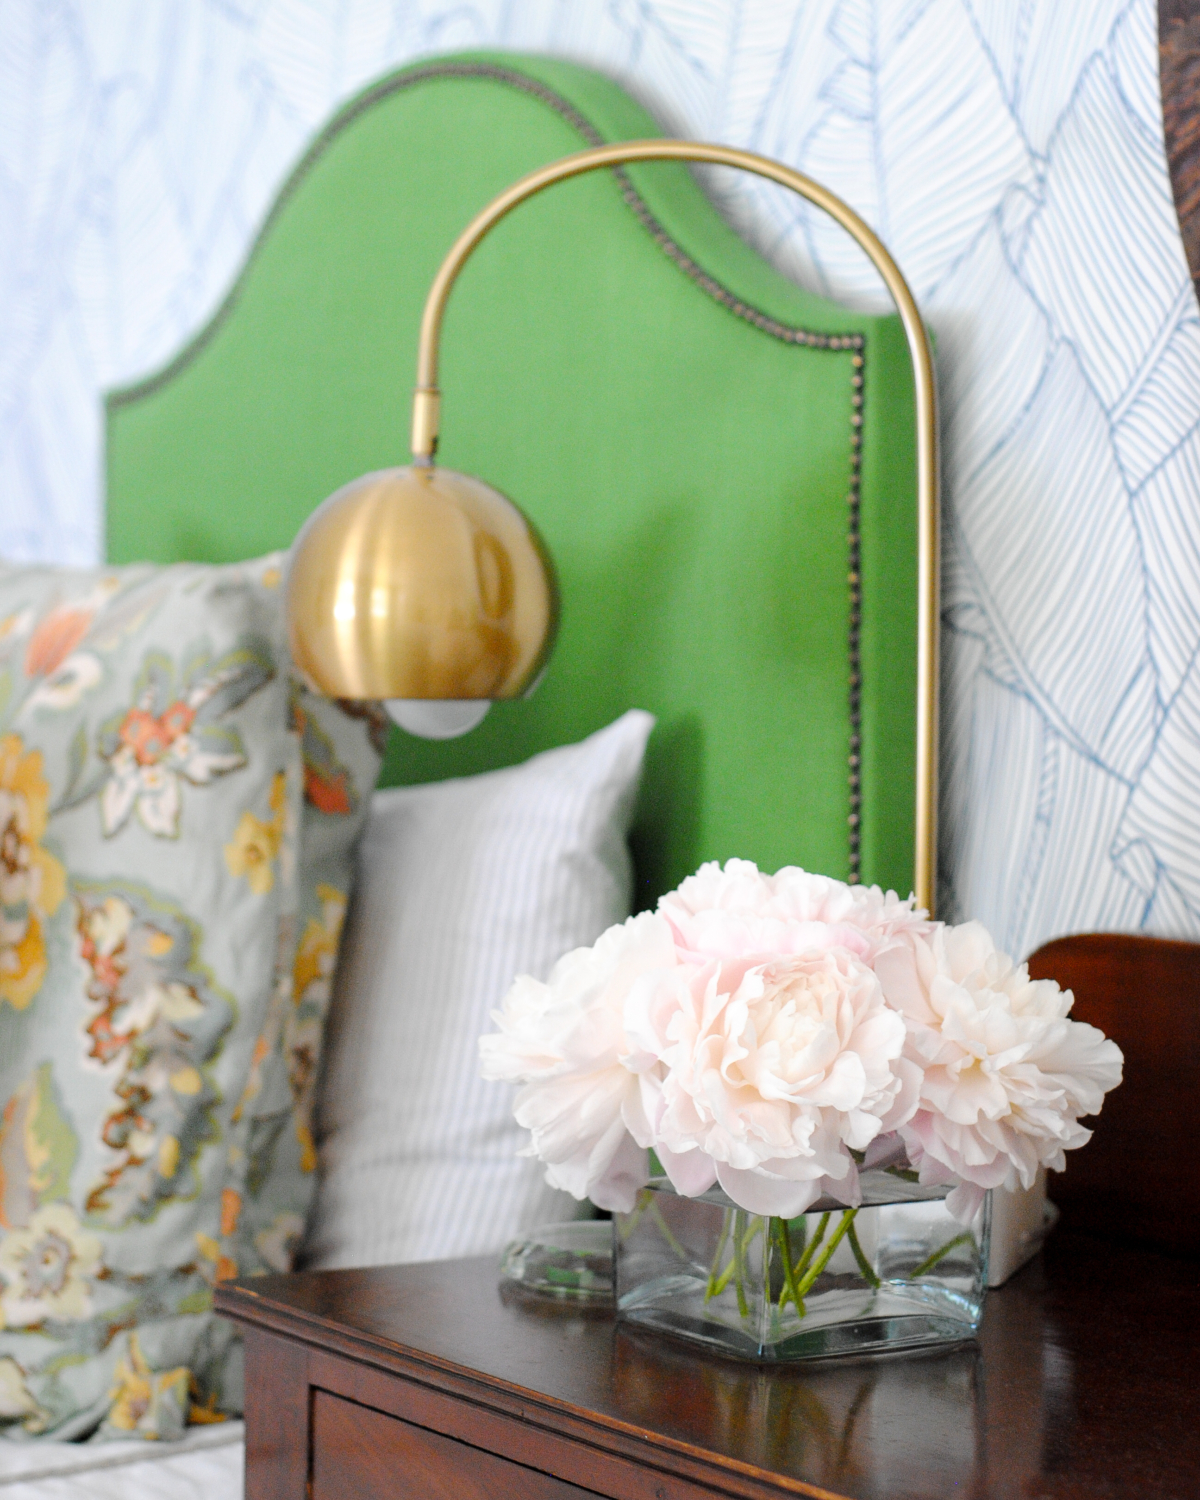
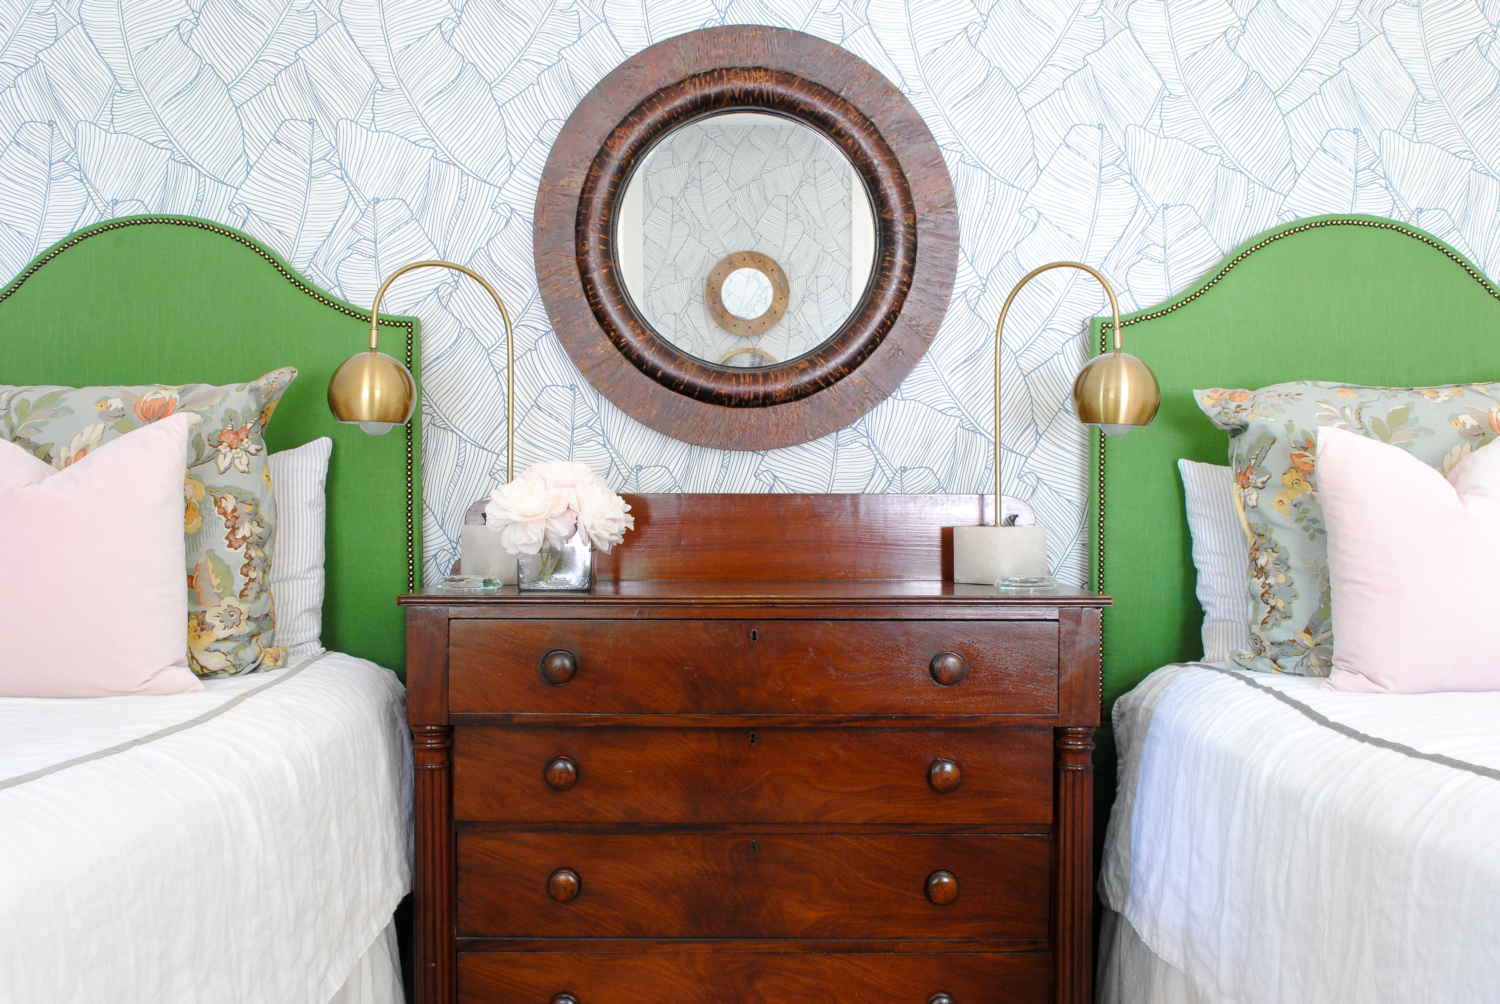
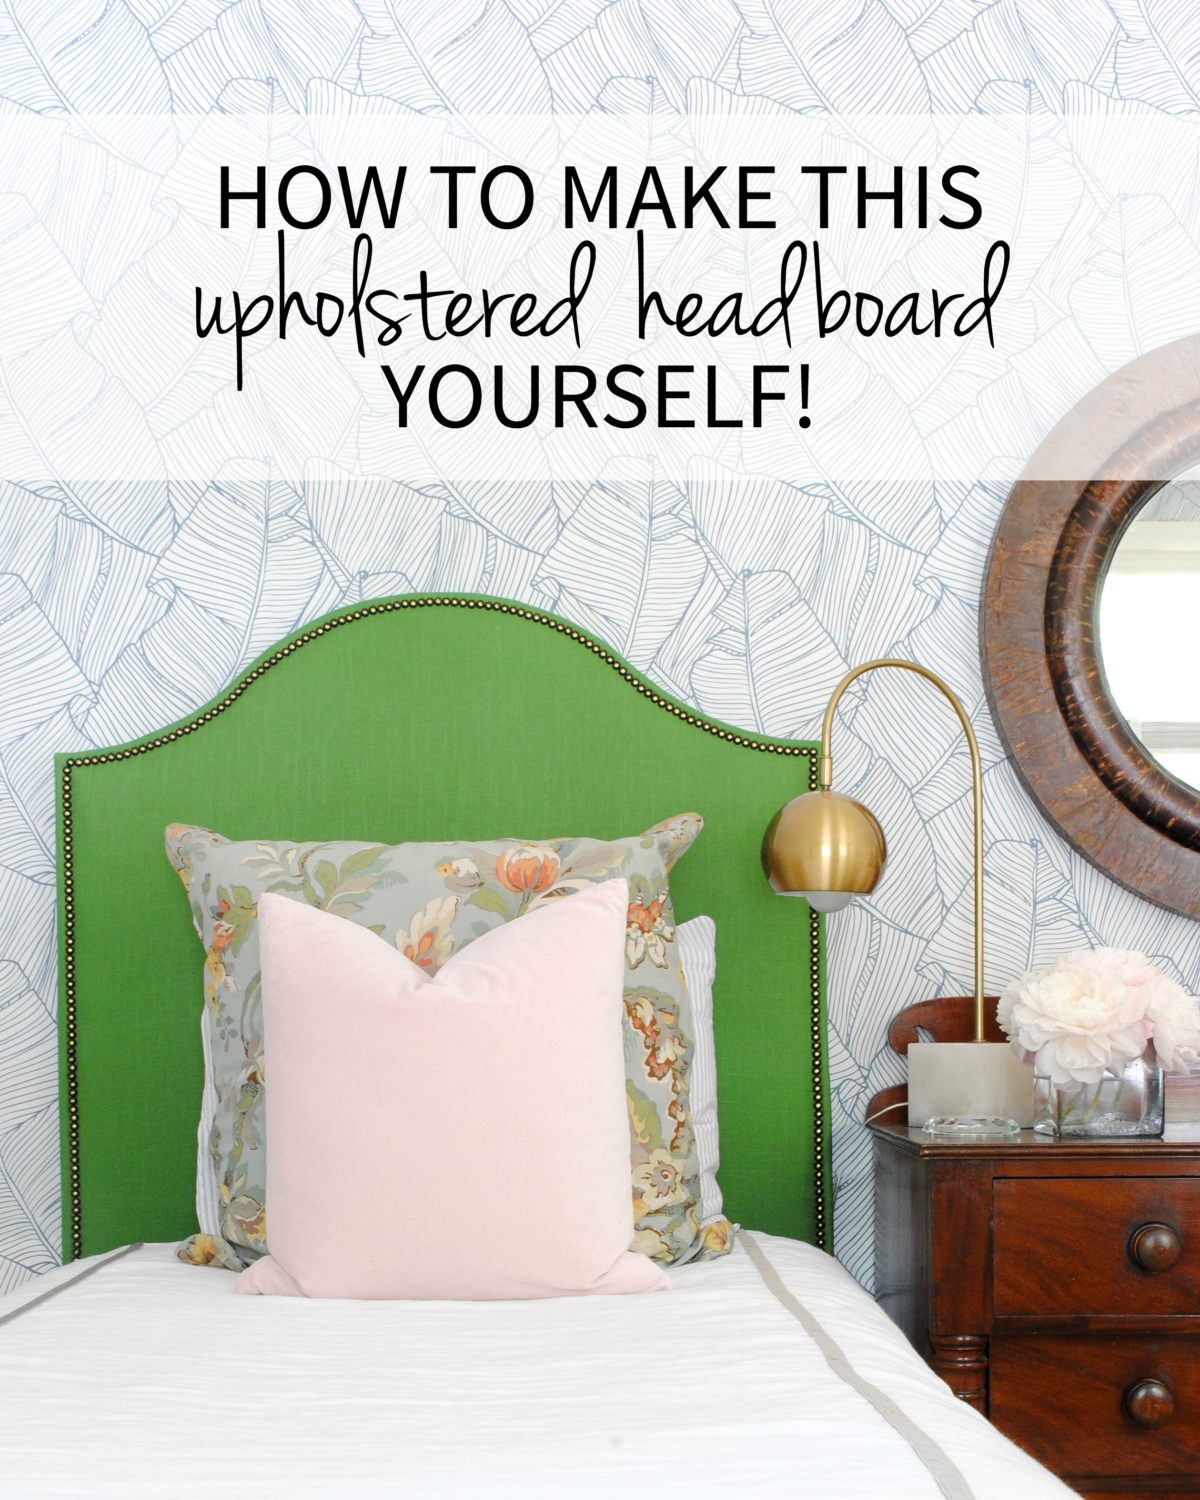
Another step in the guest room makeover is complete – a DIY upholstered headboard (actually two of them!) for the twin beds in the room. They are kelly green and linen and have aged brass nailheads and I think they are just drop dead gorgeous.
If you’re just joining me at this stage in the makeover, so far I’ve shared overall plans for the room, updated the bedding, wallpapered the walls, and added a pair of new chairs. Getting these headboards finished has done wonders for making the room feel more complete, in fact the only things I have left now are benches for the bottoms of the beds and possibly some wall art. There is one wall in particular that I think might benefit from some art and I’m looking at options now.
The fabric I chose for these headboards is Lacefield’s linen in Kelly. It is such a classic, vibrant shade of green and has that beautiful, luxurious texture linen is known for. I’ve worked with Lacefield’s textiles several times now and I am such a fan of their fabrics – really gorgeous and super high-quality (you can see some of their other fabrics I’ve worked with here, here, and here).
Here are a few more shots of the new headboards and then I’ll walk you through how to make them!

The following materials list and tutorial is for one twin headboard. I did everything here twice to make two twin headboards.
Materials
- 3/4″ inch plywood sheet, 8’x4′, cut in half (most home improvement stores will do this for you)
- measuring tape
- pencil
- circular saw
- jigsaw
- miter saw
- cordless drill/screwdriver with drill bits and screwdriver attachments
- Four 6′ pine 1x4s
- 1 1/4″ wood screws
- clamps
- 1/2″ foam
- sharp scissors for cutting fabric
- spray adhesive
- bonded dacron upholstery batting
- staple gun (you need an air compressor with this one)
- fabric
- cardboard tack strip
- Curve Ease ply grip
- heavy duty scissors
- regulator or small flat head screwdriver
- rubber mallet
- nailheads
- tack puller
- hammer
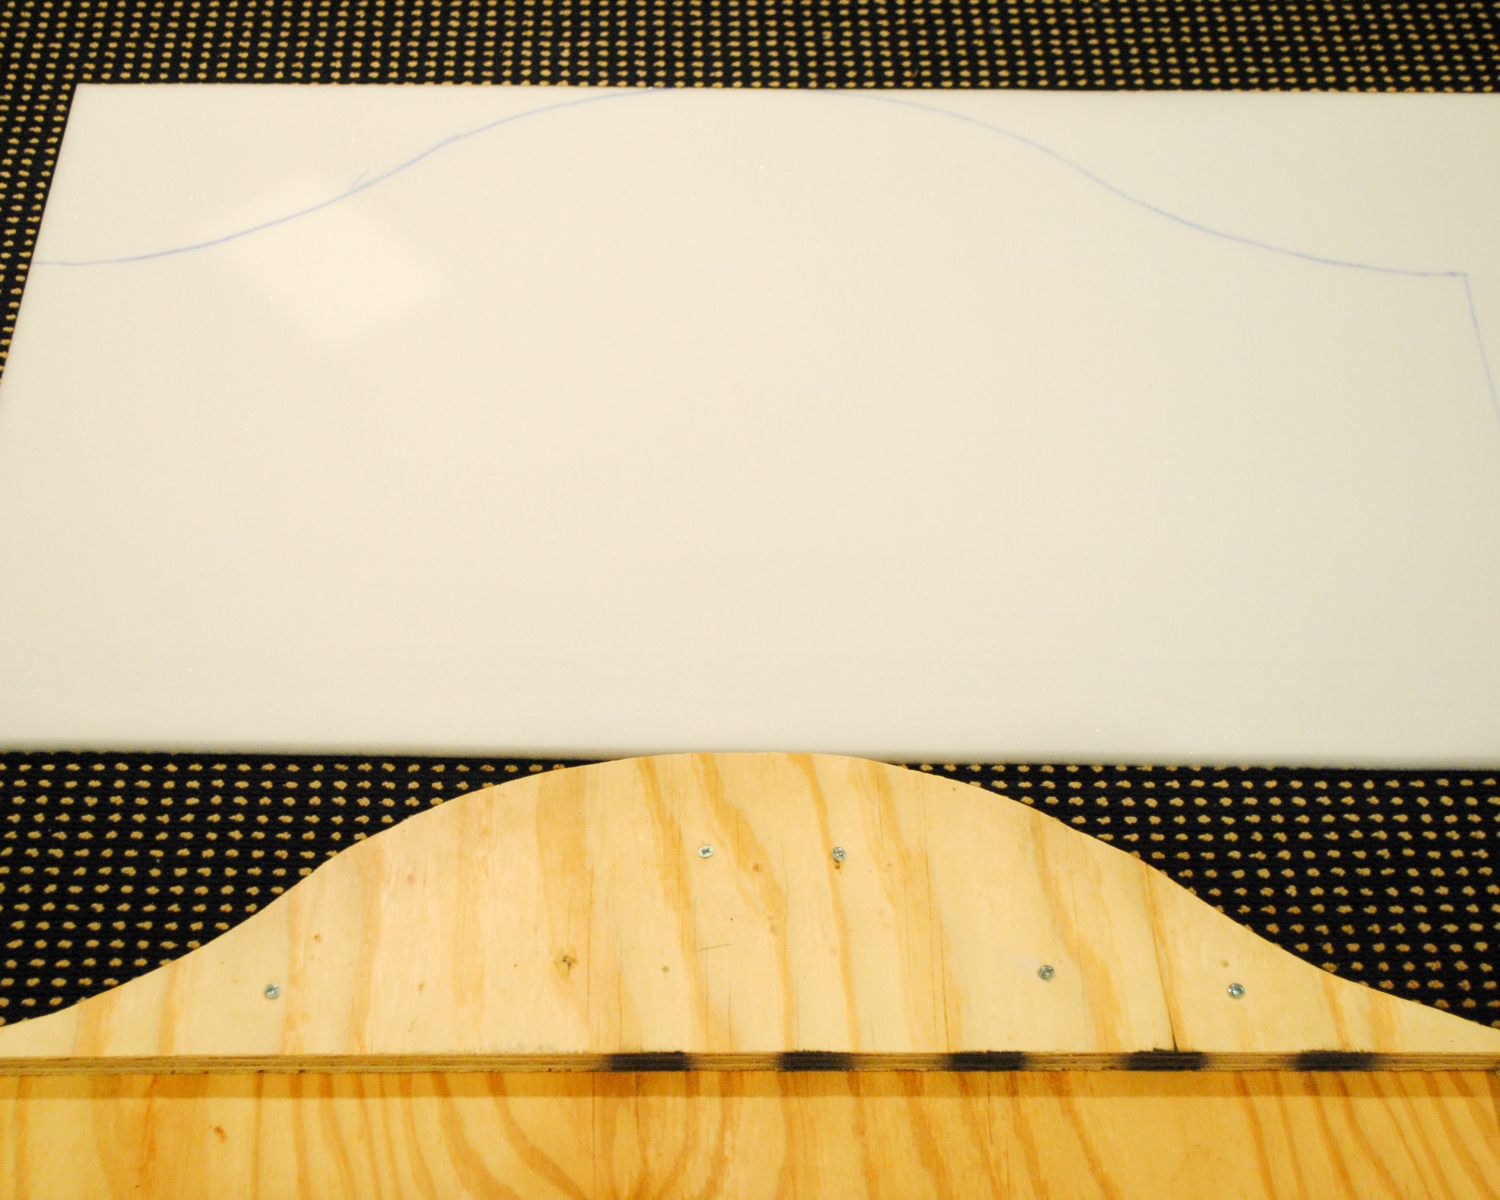
Take one of the 4’x4′ pieces of plywood, measure and mark 39″ across, and draw a straight vertical line from your mark. Use a circular saw (or table saw) to cut along the line, leaving you with a 48″x39″ rectangle. Mark a center point along one 39″ side (at 19.5″) and measure up from that mark to 38″. Mark the shape of the top with the 38″ mark as the top of the curve. I traced a large round mirror to help make a uniform curved shape. Use a jigsaw to cut along the curved line and make the headboard.

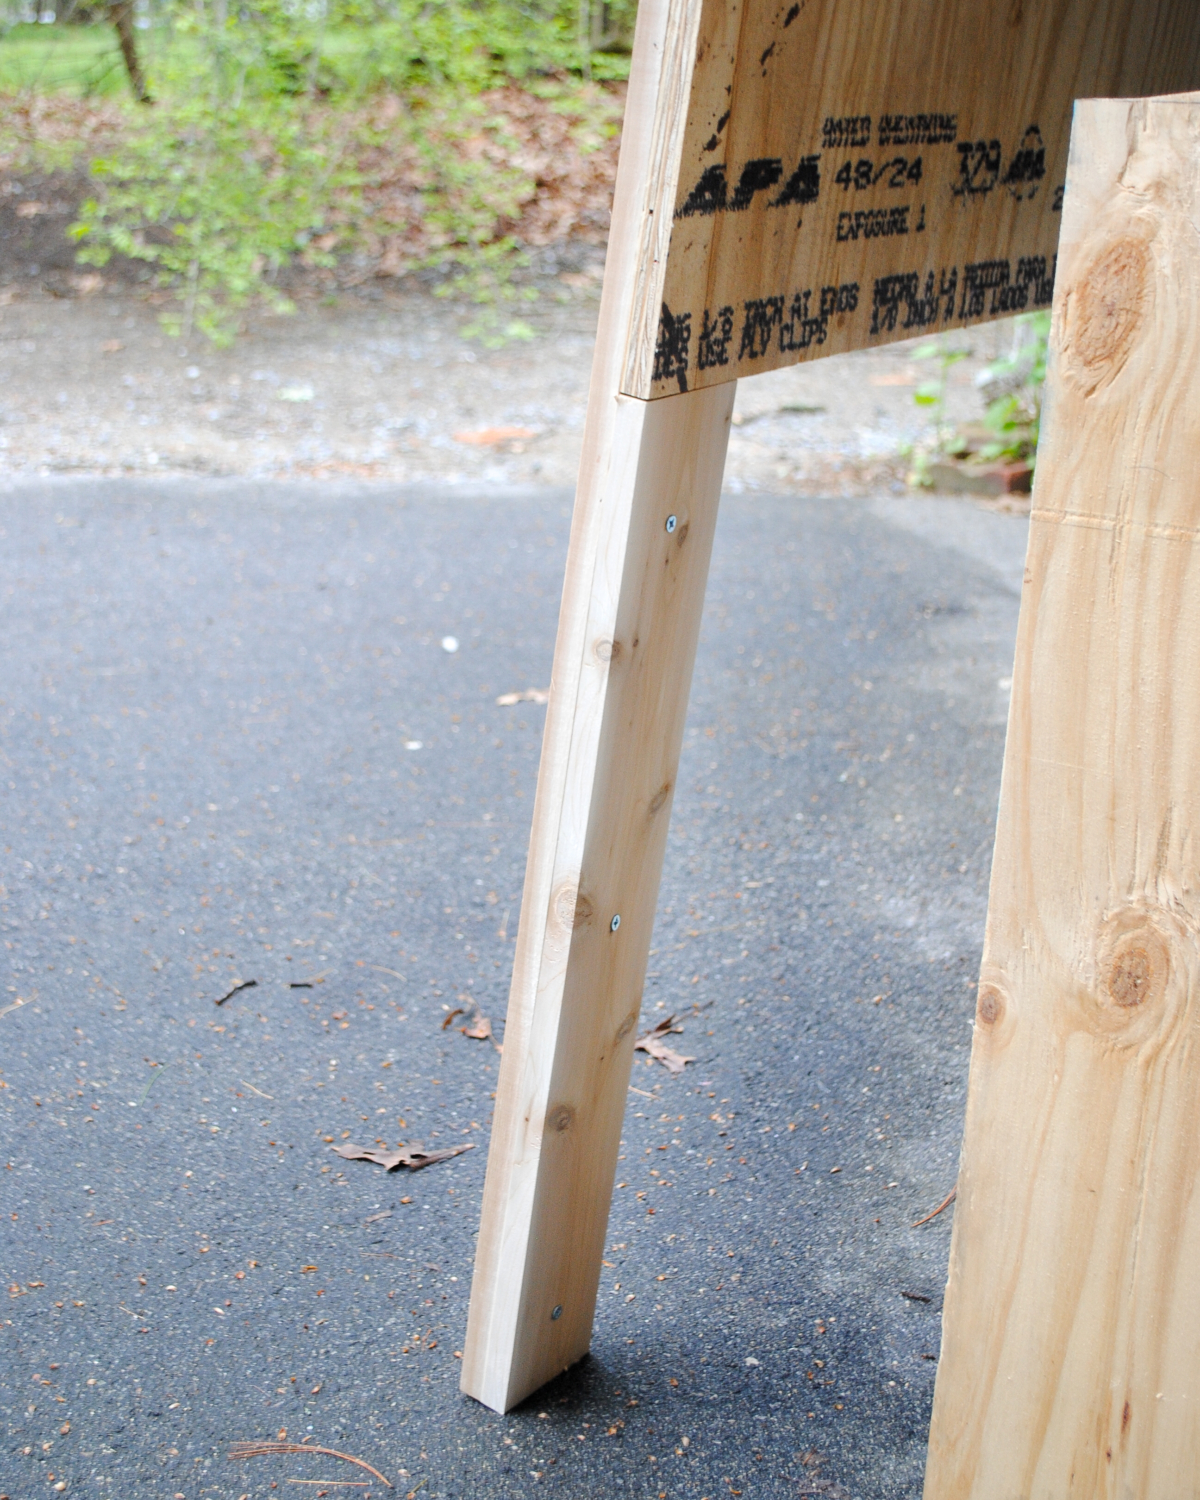
Use a miter saw to cut two of the 1x4s to 55″ long. Clamp them to the sides of the headboard and attach with a cordless drill/screwdriver and 1 1/4″ screws

Cut another of the 1x4s to 32″ long and screw to the headboard running horizontally between the two legs. Take a scrap piece of plywood from cutting the headboard and attach it to the top of the headboard with 1 1/4″ screws. Use a jigsaw to trim the shape to match the top curve. This all makes up the back of the headboard.
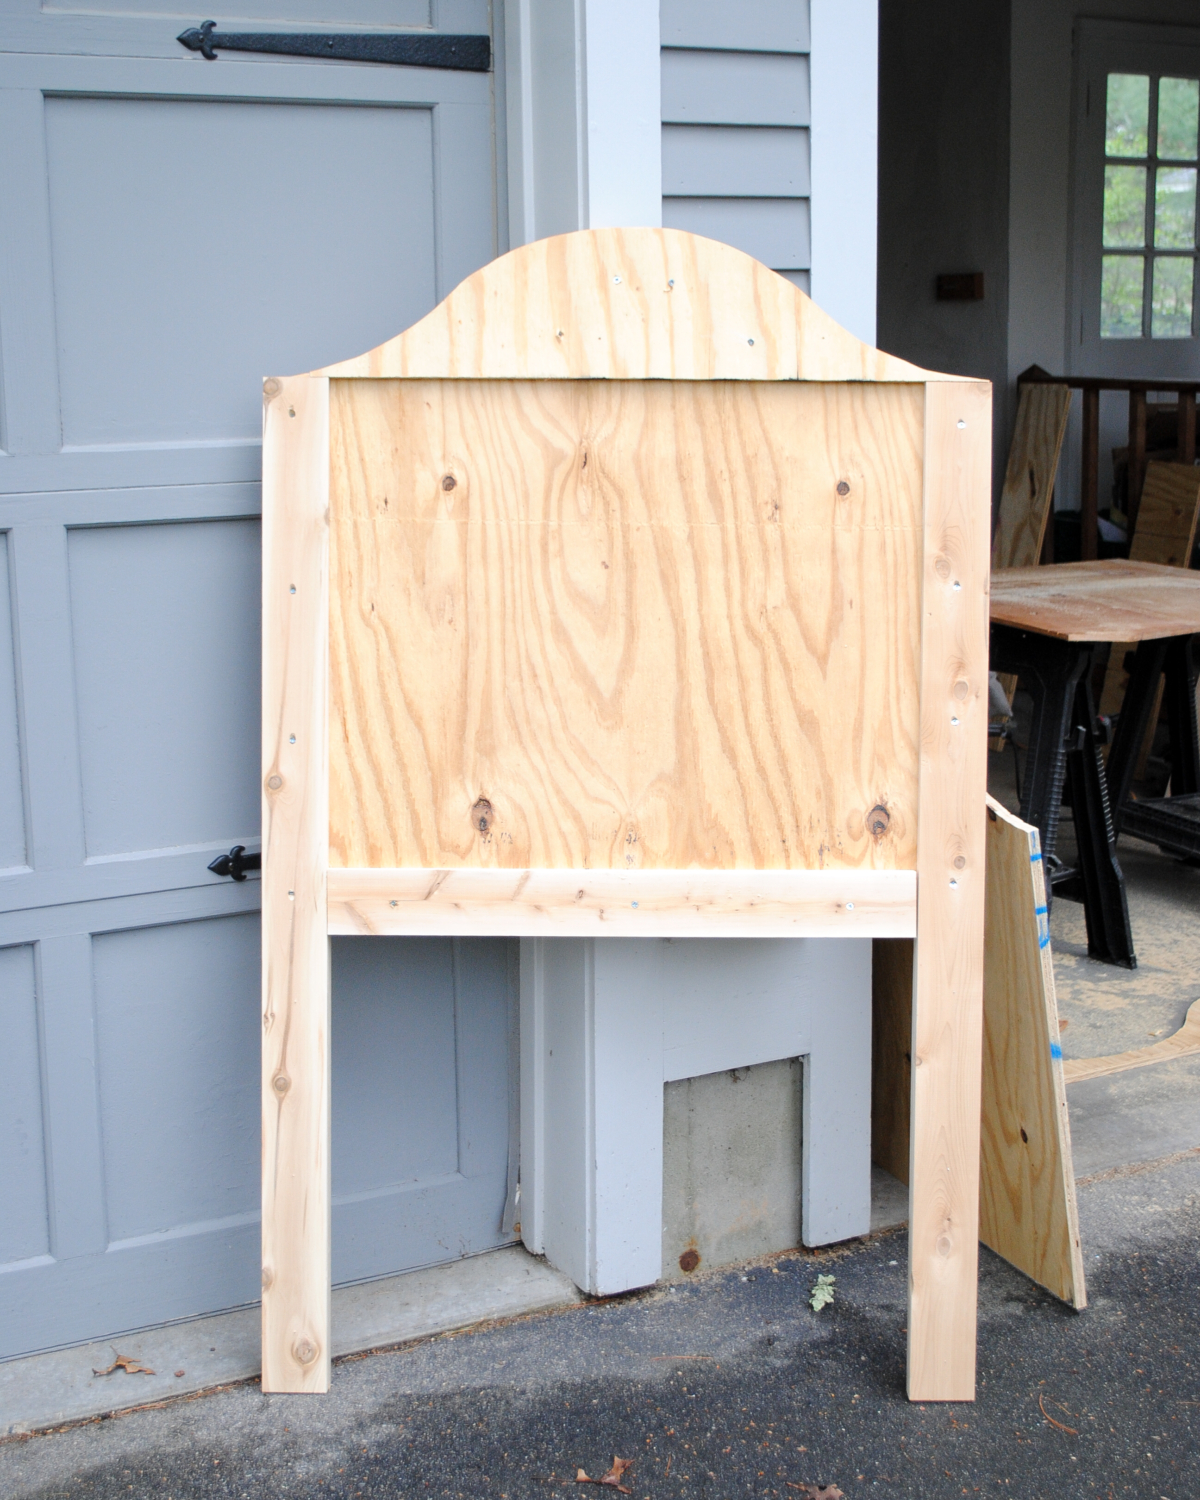
Take the last 1×4 and cut two 25″ pieces. Attach to the front sides of the legs with 1 1/4″ screws. I don’t have a photograph of this next step but hold the headboard up against the bed frame at this point and mark where you will attach the headboard to the frame. Drill holes at your marks large enough to accommodate bolts for when it’s time to attach the headboard to the bed frame. All bed frames are different so you’ll need to see what size bolts work with yours.
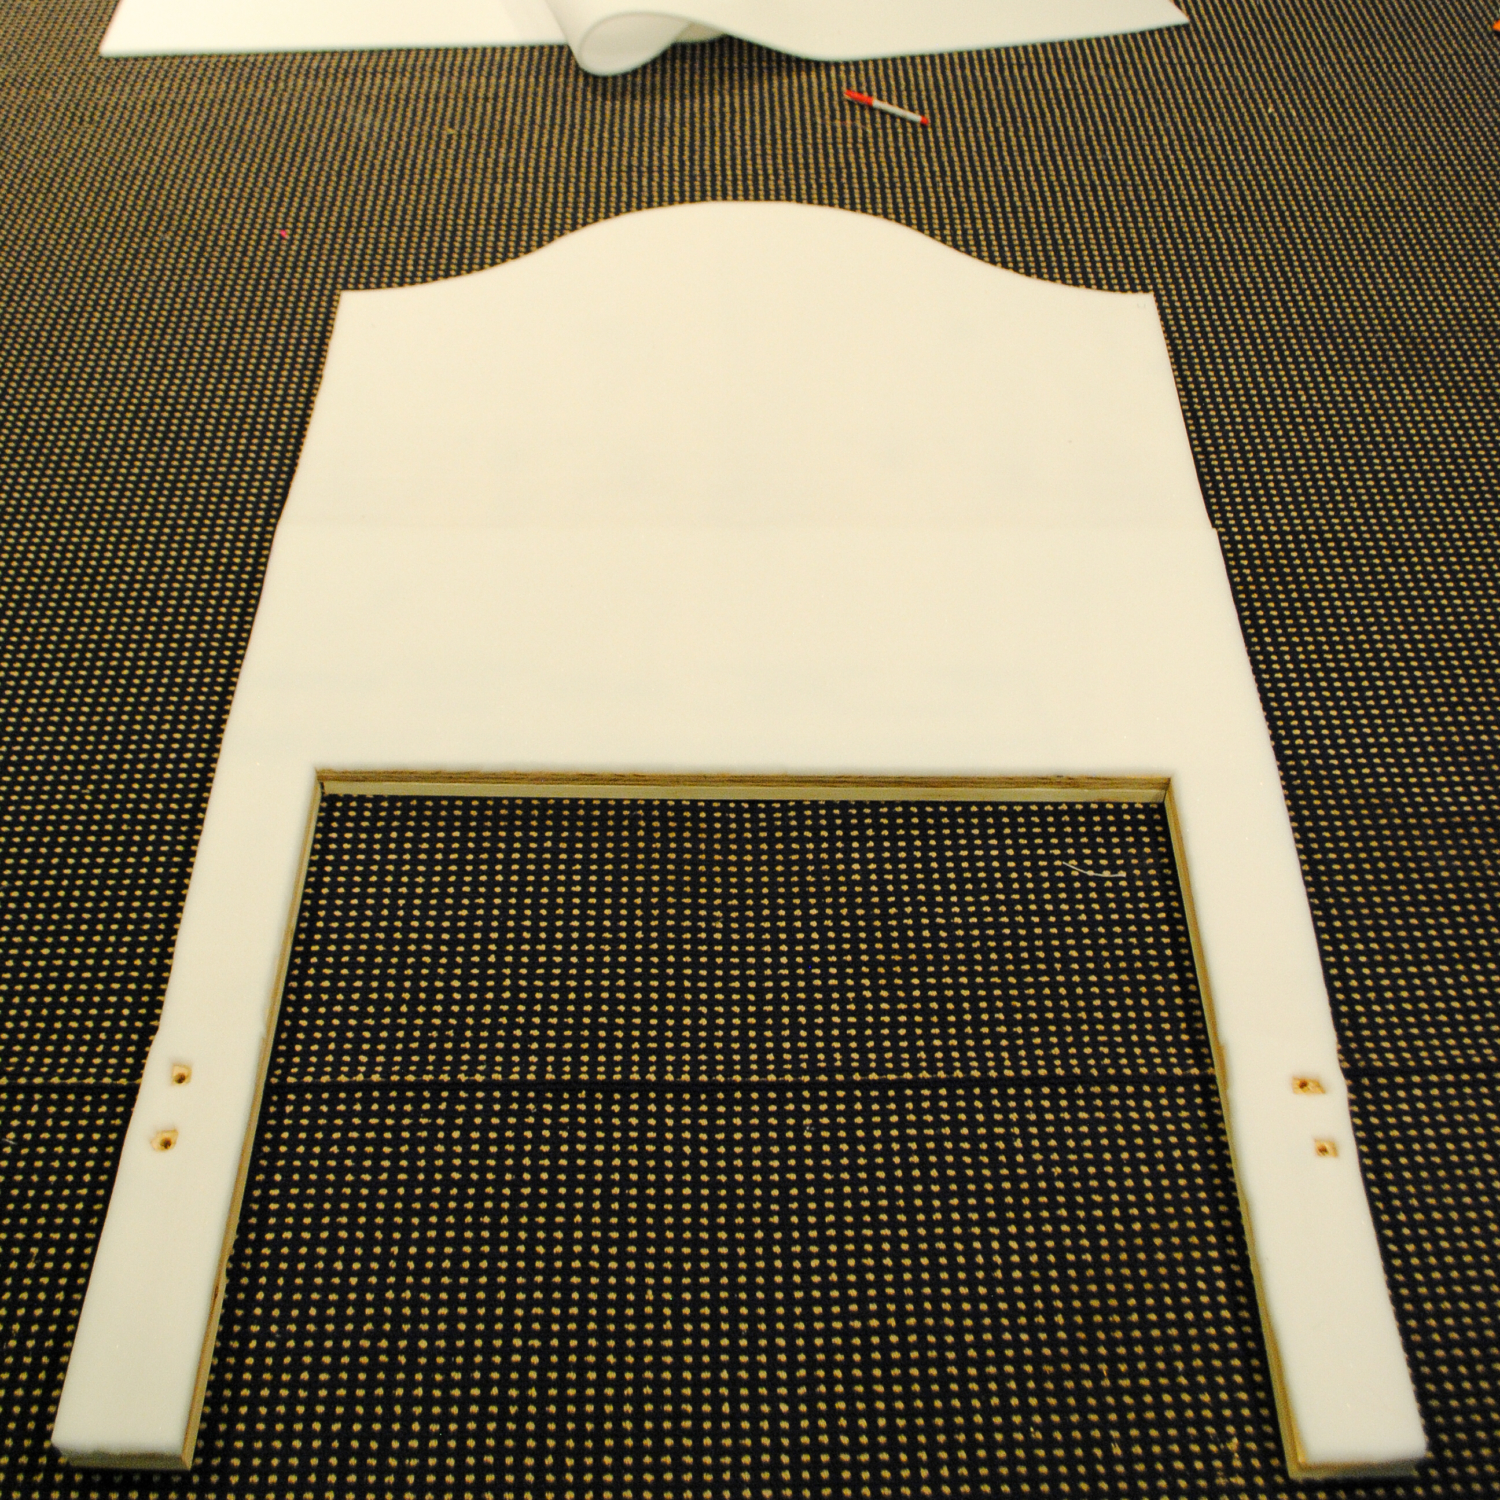
Lay the assembled headboard on top of your 1/2″ foam and trace the top shape. Cut it out and attach it to the front of the headboard using spray adhesive.
Cut additional rectangular pieces of foam and attach with spray adhesive to completely cover the front of the headboard with foam. Cut holes where you drilled for future bolts.
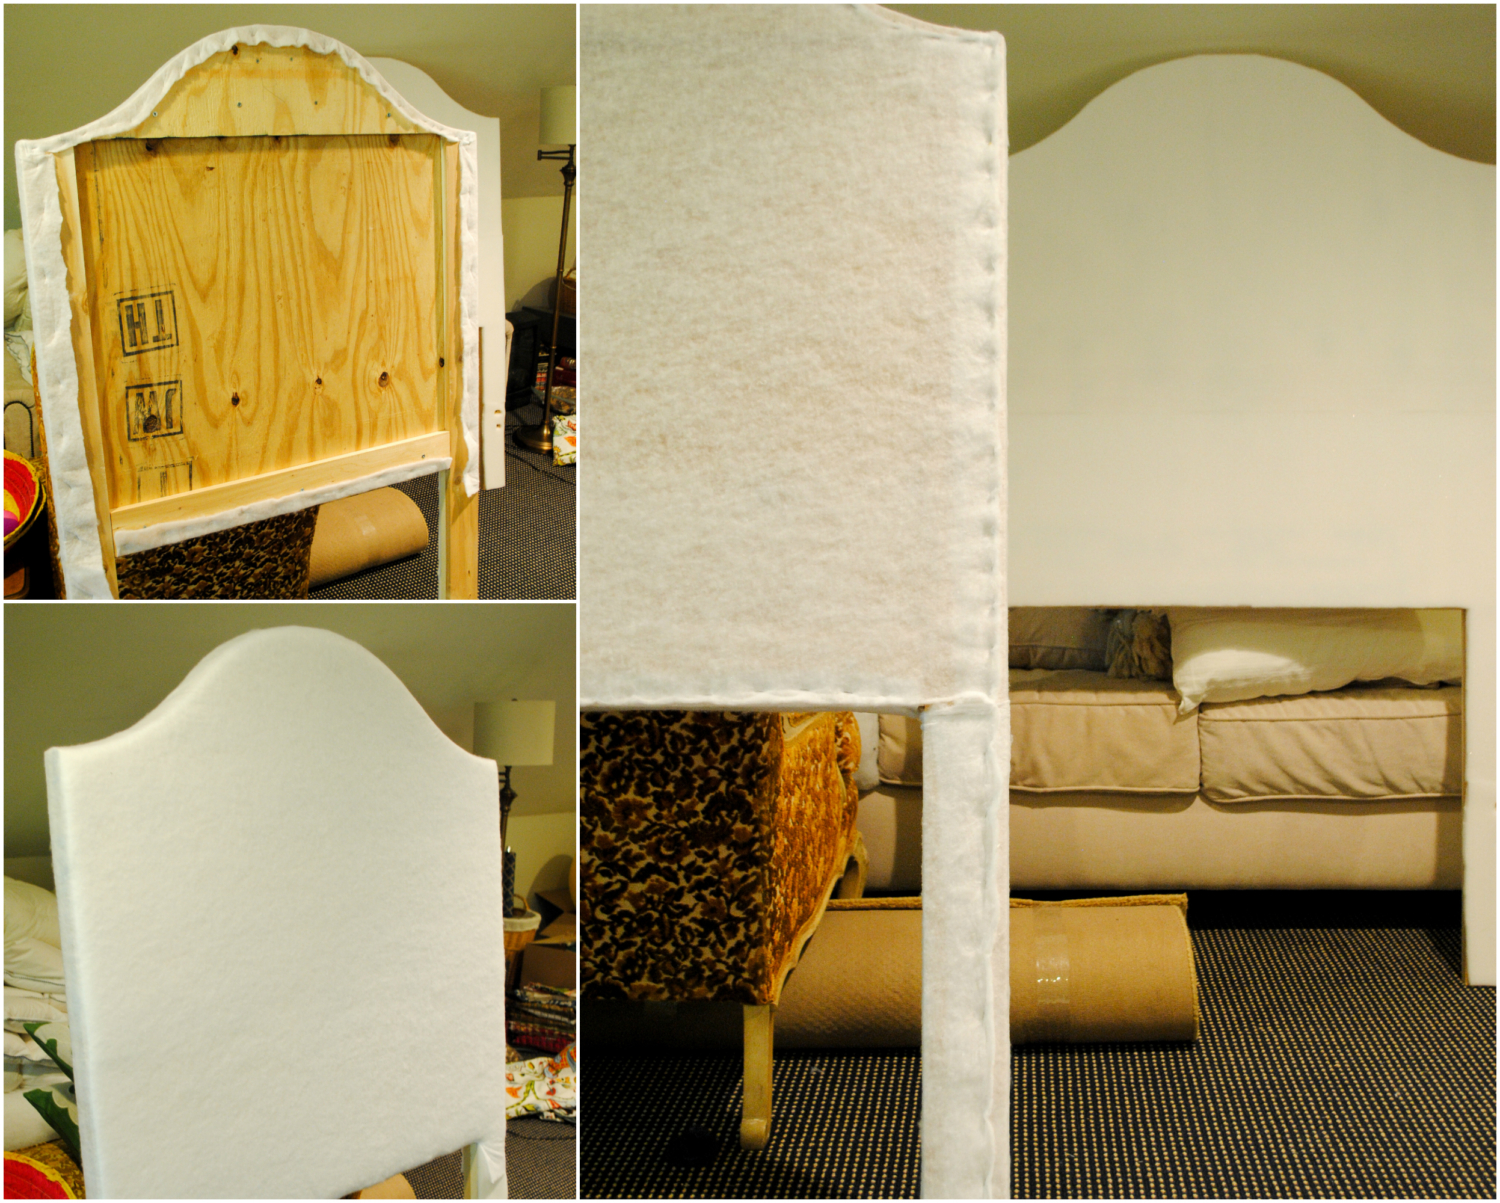
Wrap the headboard and legs with bonded dacron batting and staple in place. I started by wrapping the front and stapling on the back, then wrapped the legs, and finally the back. You want the finished batting to be pulled taut and smooth. Cut holes in the batting in both the front and back where the bolt holes are.
For the fabric, I also started with the front. Lay the headboard on your fabric and cut a piece a few inches larger than the headboard on all sides. Center the headboard on the fabric and make cuts along the insides of the legs to allow you to wrap and pull the fabric through between the legs.
Staple in place along the back bottom.

Pull the fabric up over the top of the headboard and staple in place in the center of the top back. Alternate stapling between the sides and the top to make sure everything is pulled tight and smooth. I did a few staples in the center top first, then did the sides (leaving things open near the top corners), then finished the remainder of the top.

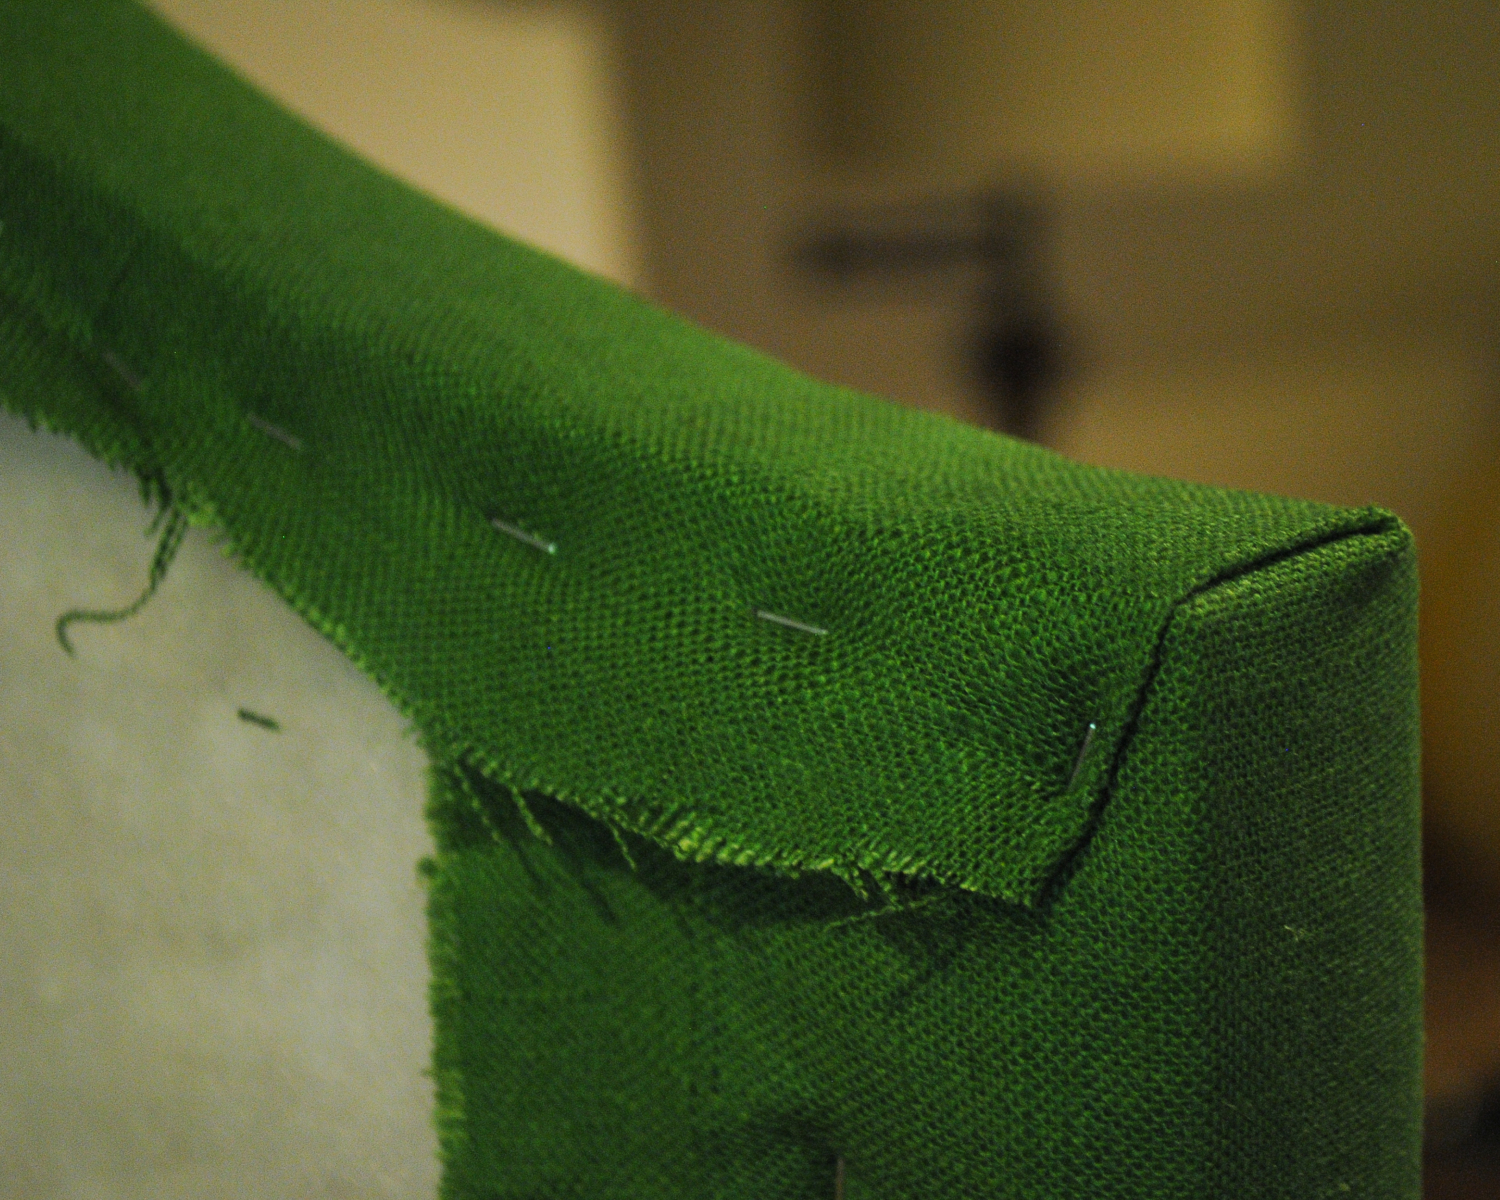
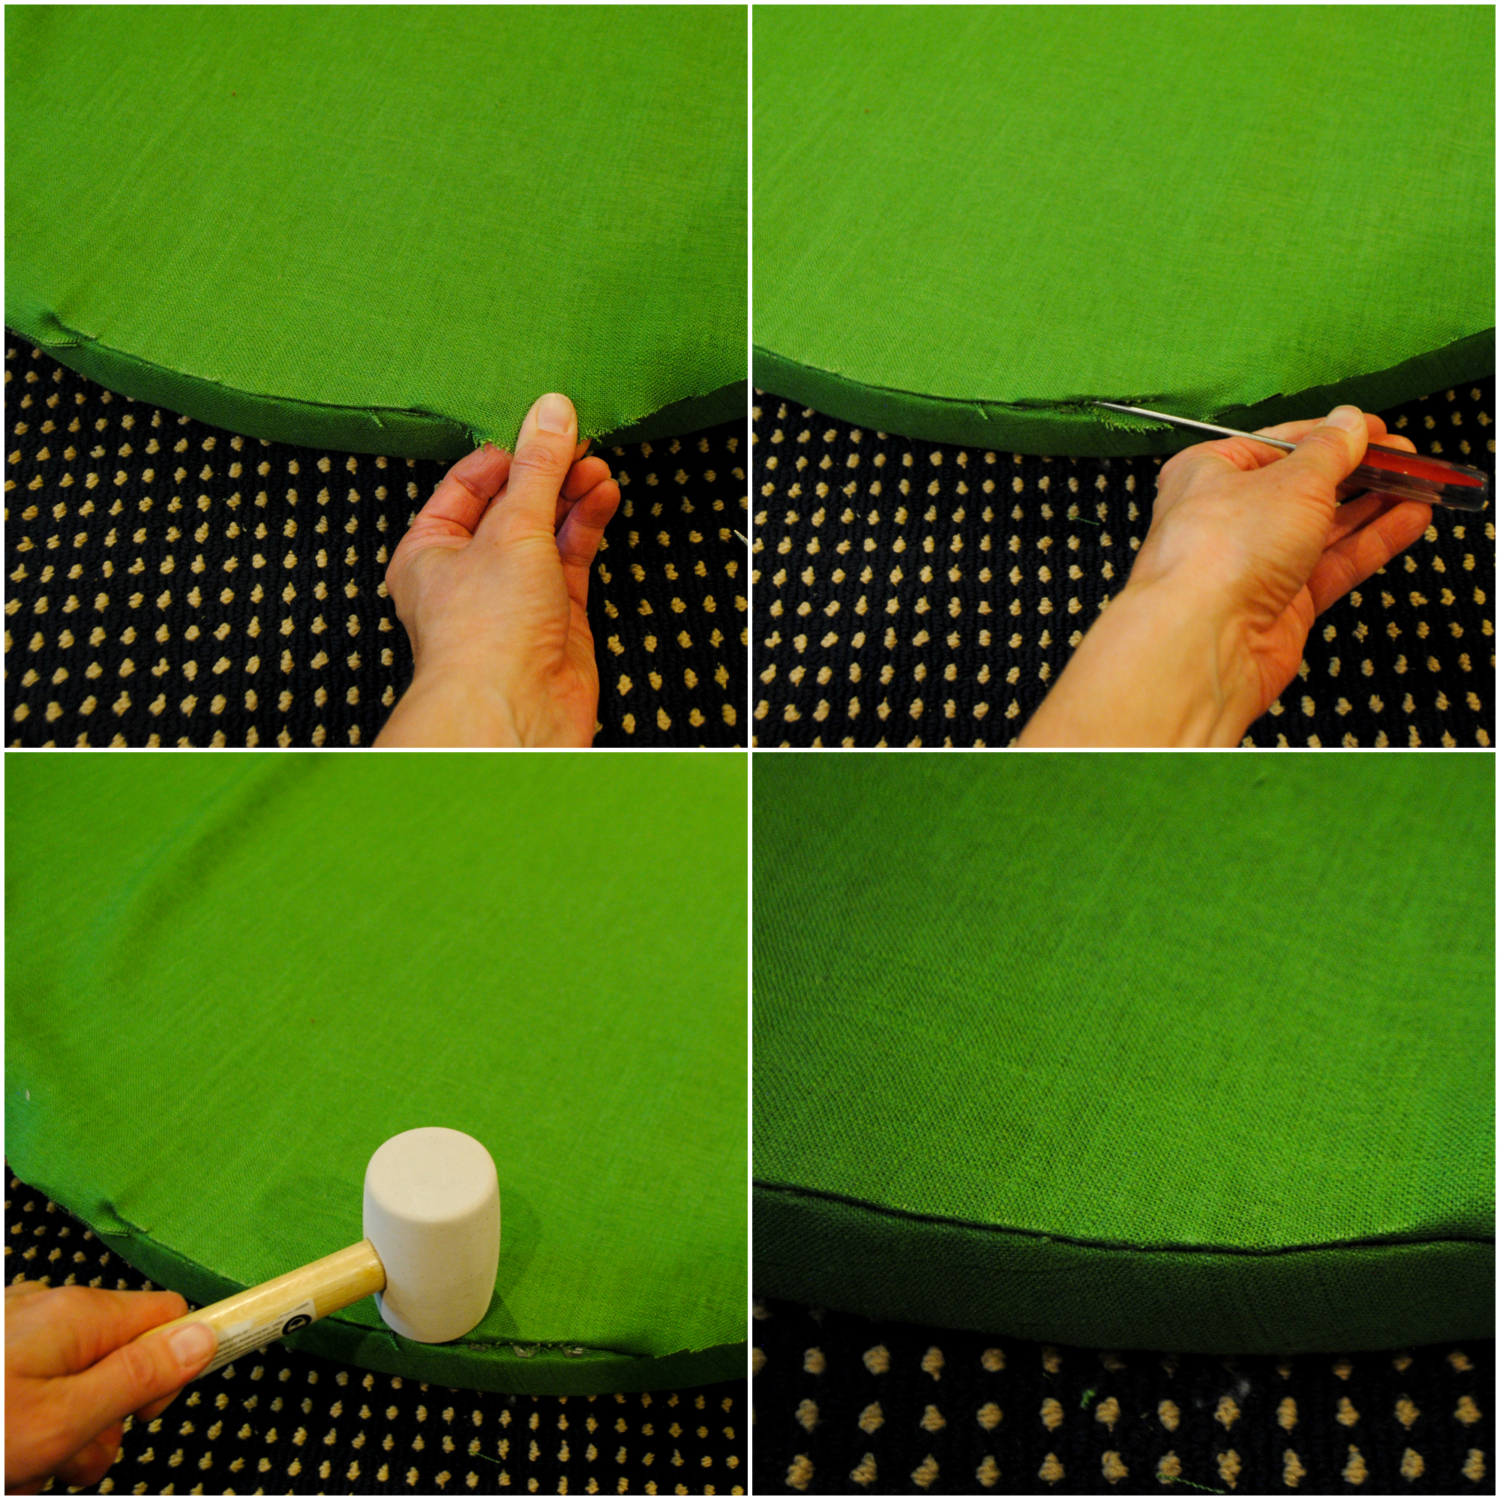
At the corners carefully tuck and staple so the folds are neat and tight.
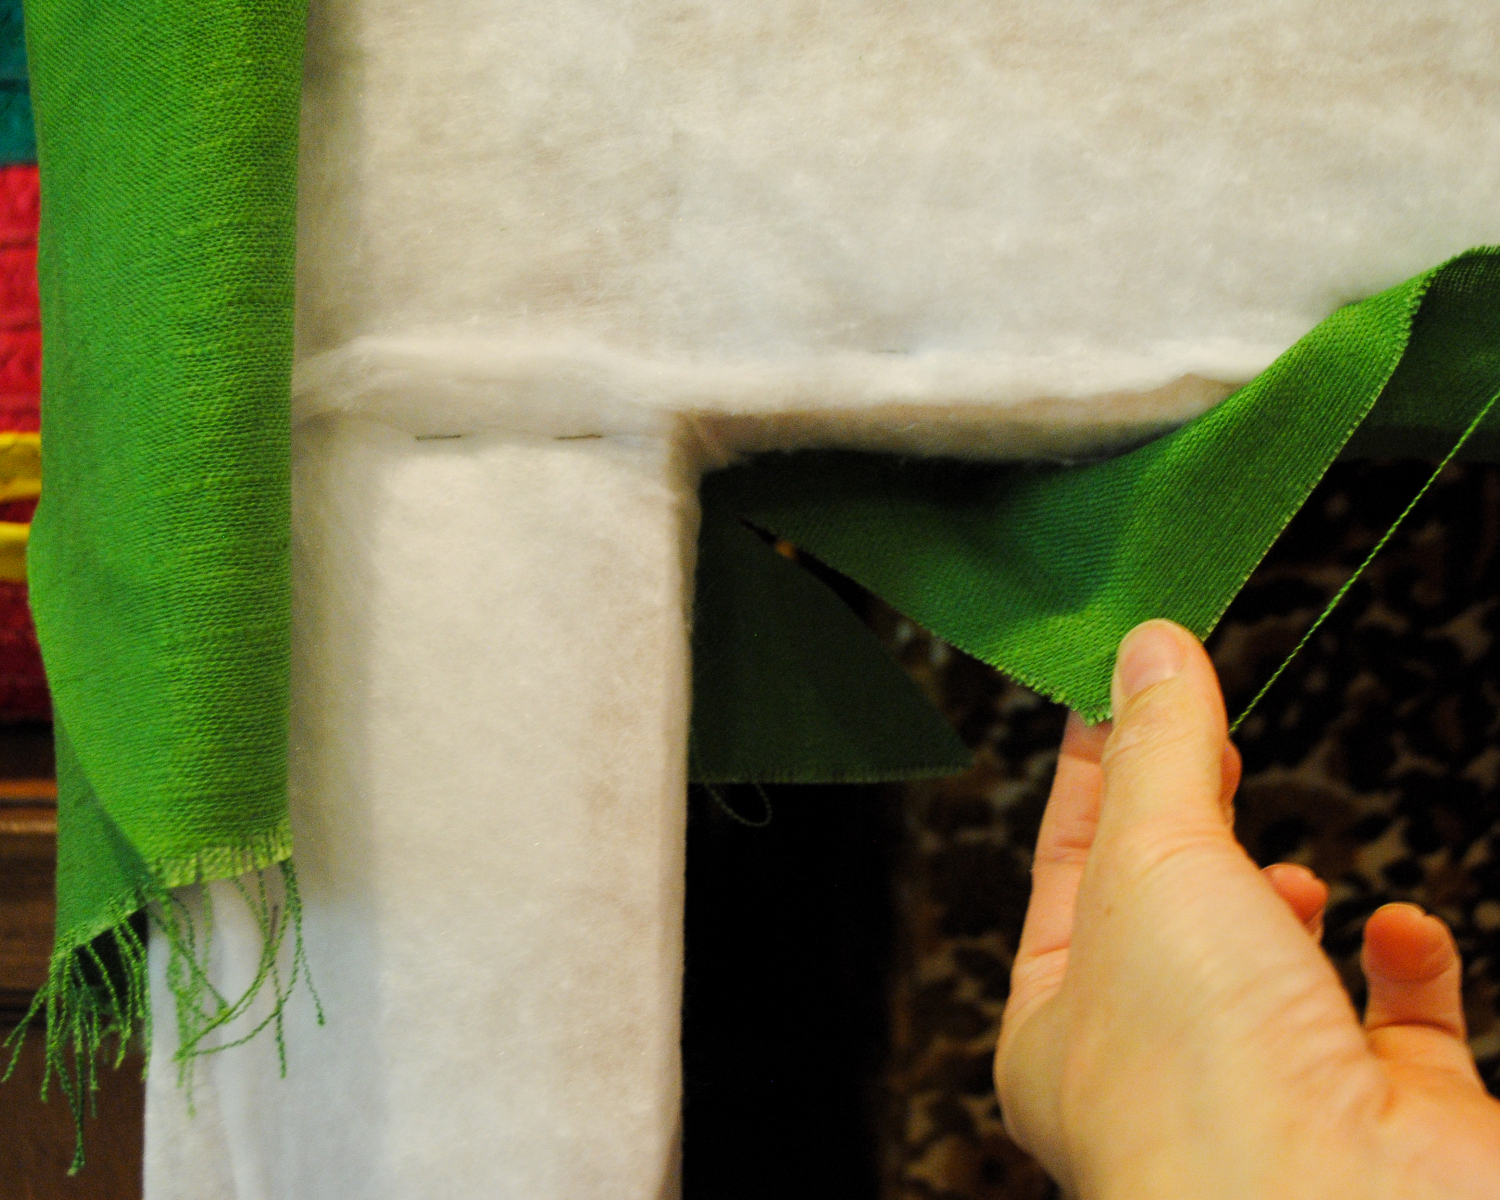
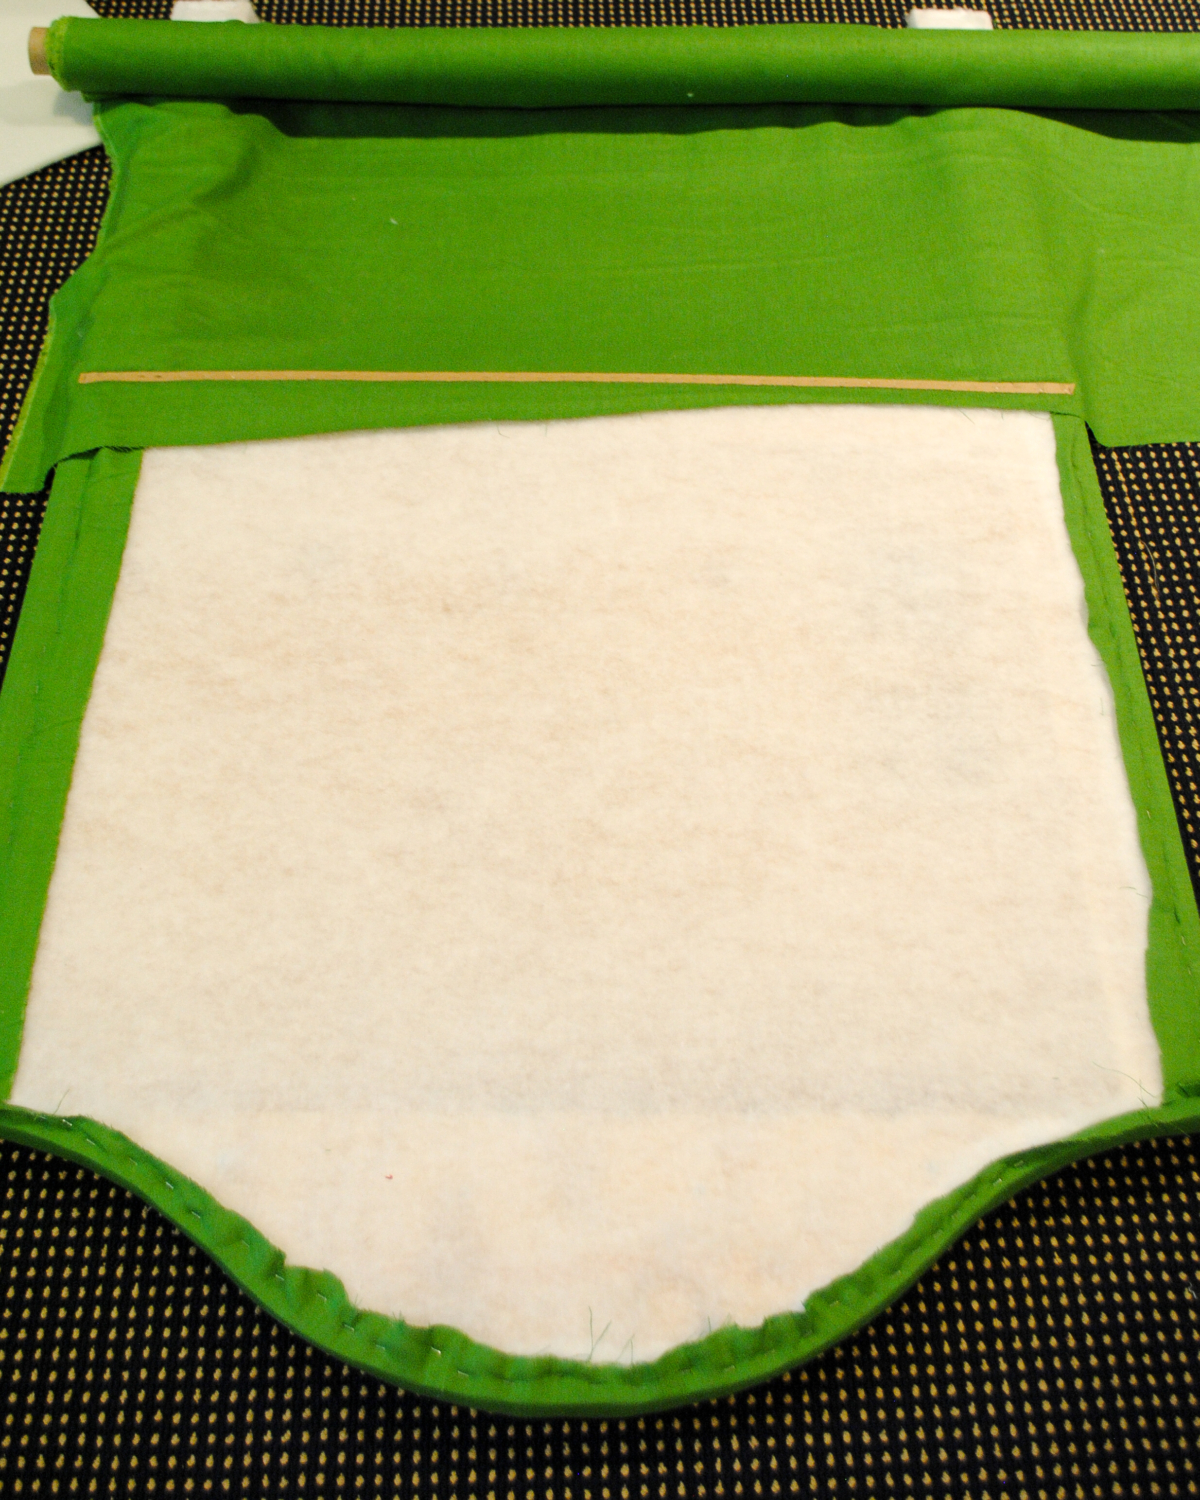
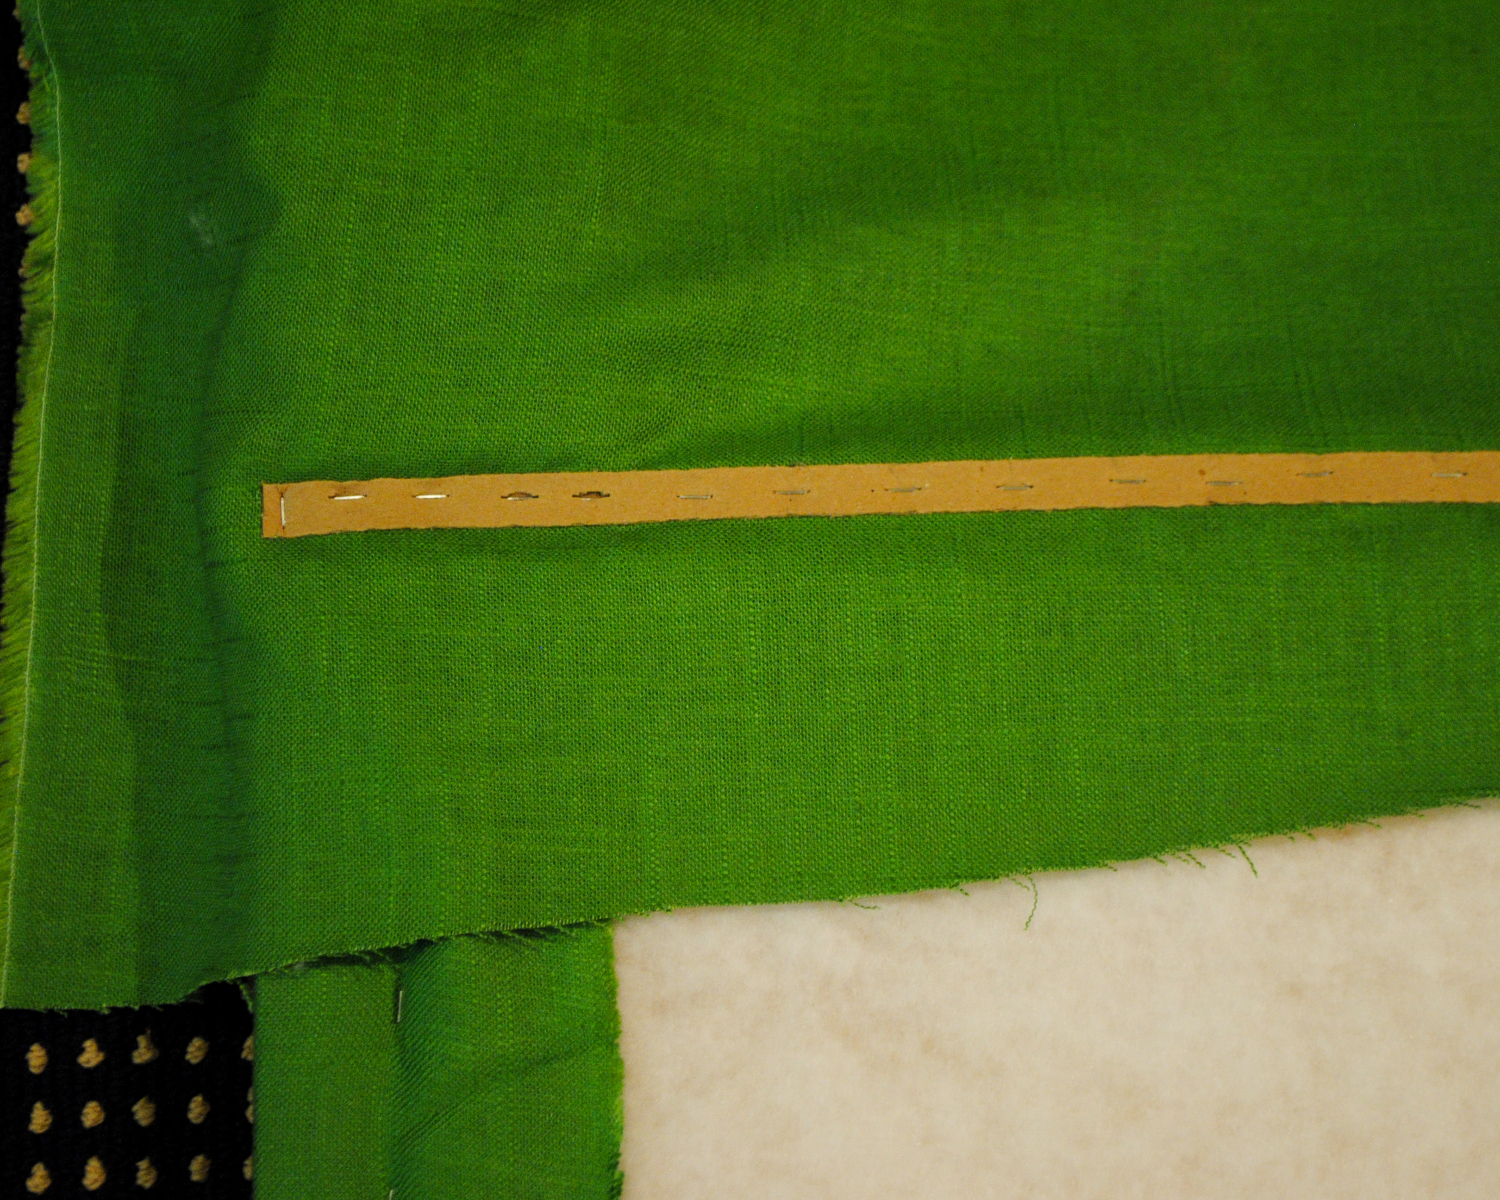
For the back, flip the fabric upside down with the edge of the fabric coming up over the bottom edge of the back of the headboard. Cut a piece of cardboard tack strip to the same width as the headboard (39″) and staple in place on top of the upside down fabric.
Staple Curve Ease ply grip all along the sides and top of the headboard. One staple goes into each hole of the ply grip. Make sure you use heavy duty scissors to soften any sharp edges where you cut the ply grip to fit. And be careful of your hands – this stuff is sharp! Press each open mouth of the ply grip down about halfway. This is a good video showing how to apply ply grip if you’d like a little more detail.
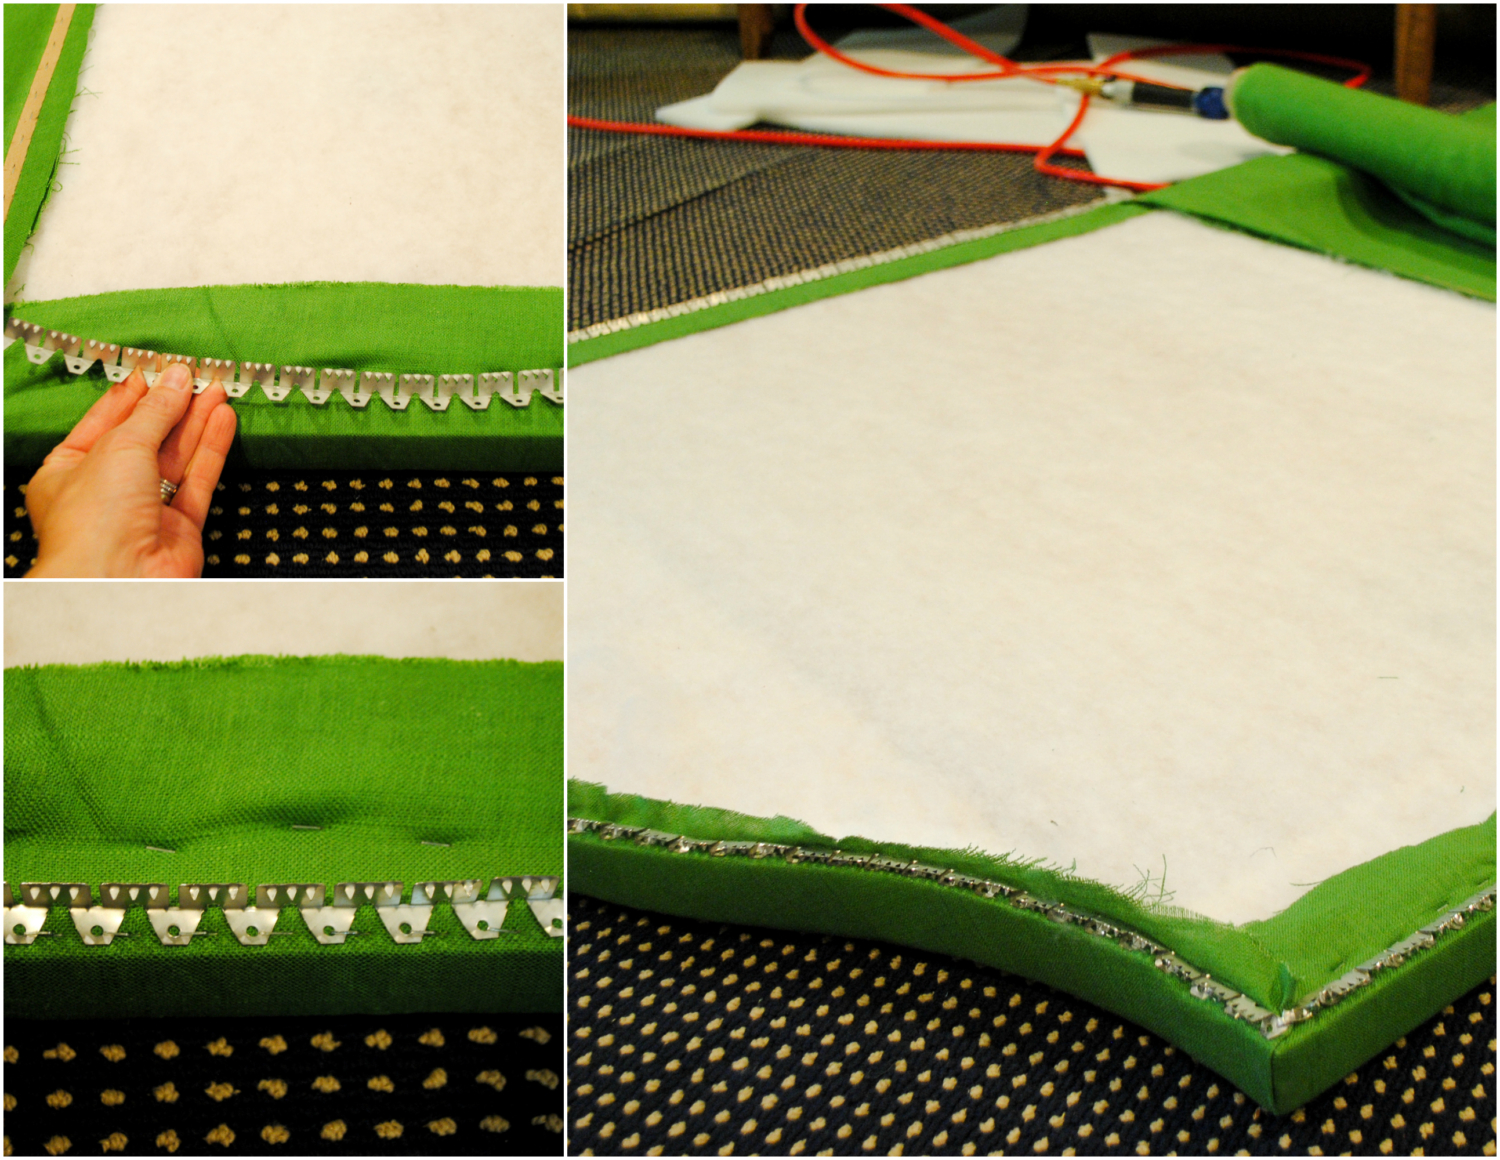
Pull your fabric up from the bottom tack strip and trim to be about 1/2″ larger than the headboard shape, following the curve of the top and the lines of the sides. To finish the back using the ply grip, you pull the fabric over the edge of the ply grip one section at a time, use a regulator (or small flathead screwdriver) to tuck the fabric inside the semi-closed mouths of the ply grip, then use a rubber mallet to hammer the ply grip shut over the tucked edge of the fabric. Again, the video I mentioned above shows in detail how this all works if you need clarification.
I neglected to take photos of covering the legs in fabric, but cut more cardboard tack strip (enough to wrap around the leg) and follow the same process as for the bottom of the back to get a crisp edge along the top of the legs, then fold and staple the fabric underneath and on the backs of the legs. You could use more ply grip to get a perfect seam along the back but, honestly, at this point I was ready to get these headboards finished and knew the back would be against the wall anyway so I just folded and stapled neatly.
To give the headboard that little extra something, you’ll want to hammer the nailheads in now – check out this post for details and video showing the easiest way to add nailheads to furniture.
After the nailheads are done you’re ready to attach your new headboard to the bedframe! Cut small slits in the fabric where your bolt holes are and use appropriately-sized bolts, washers, and nuts to attach the headboard to the bed frame.


these are fantastic! and the green though! so good.
My bedroom is jealous of my guest room for sure ;) Thanks, Cassie!
I love this room Jen! The color pallette is amazing! Those turned out fab :)
Thank you :) So this has been a good lesson for me in planning and patience. I can be so rash and often dive into projects before thinking them through all the way and this time I laid out a six-color color palette before starting, figured out where those colors would appear in the room, and then started working from there. And it really has been a great learning experience for me as to the value of that forethought in pulling a vision together. #longwindedreply ;)
How fun is that bright green against the blue & white wallpaper! The headboards came out great and I just love the color palette in this room!
Thanks so much, Lisa! I am really loving the colors too, it’s been fun to plan this room out and then see it come together like I pictured :)
Jennifer! This is total perfection. I can’t believe how straight you got those nail heads. Love this project so much. So profesh. And your styling is on point. Perfect pattern and color mix. Magazine ready!
What a super nice comment, Katja. Thank you :) My nailheads execution has come a long way since I first started!
So beautiful! Love the combo of the wallpaper and the green. Did you use the same tool for the nail heads that I did with Lilly’s headboard. I wish I would have made a video when I made mine :( Can’t wait to see it.
I didn’t use that tool but actually was just rereading your post about Lily’s headboard to see how you did it! I just freehanded it basically, but drew a guide line on the fabric to help get them straight.
Soooo pretty! I’m impressed that you covered the back, too. Who does that? #overachiever ;)
I know…I had a long moment when I sat there and stared at it and thought, “I really don’t have to cover the back, no one will see it,” but then decided to do it anyway, just to really do it “right.” Not sure I would do the backs again though! It’s totally invisible once the headboard is on the bed!
Oh wow, the headboards are amazing.
Thank you, Marty!
Impressive!! Love the color and you even did the back side?? You are good!
Ha, I know! I’m not sure what I was thinking doing the backs too!! Thanks for the nice comment, Shauna :)
crazy good!
Thanks, Gwen :)
I love the nail head detail on these headboards! I have made several headboards but am getting ready to try my first with nail heads. In the past I have always used a slightly thicker foam (1″-2″) depending on the style of the headboard. Do you find that the 1/2″ is the best thickness to use when using nail heads?
That’s exactly why I went with the 1/2″ foam – I thought anything thicker would interfere with the nailheads and I didn’t need a super cushy foam for the headboards, just something to soften them a bit. Good luck with your project!
That’s exactly why I went with the 1/2″ foam – I thought anything thicker would interfere with the nailheads and I didn’t need a super cushy foam for the headboards, just something to soften them a bit. Good luck with your project!